Culling the Cookbooks

6 Comments

Today I decided that it was time to bite the bullet and seriously consider what cookbooks I really needed to keep.  I did not have a large collection but I knew that there were some that had survived previous attempts to reduce the collection.

Cookbooks
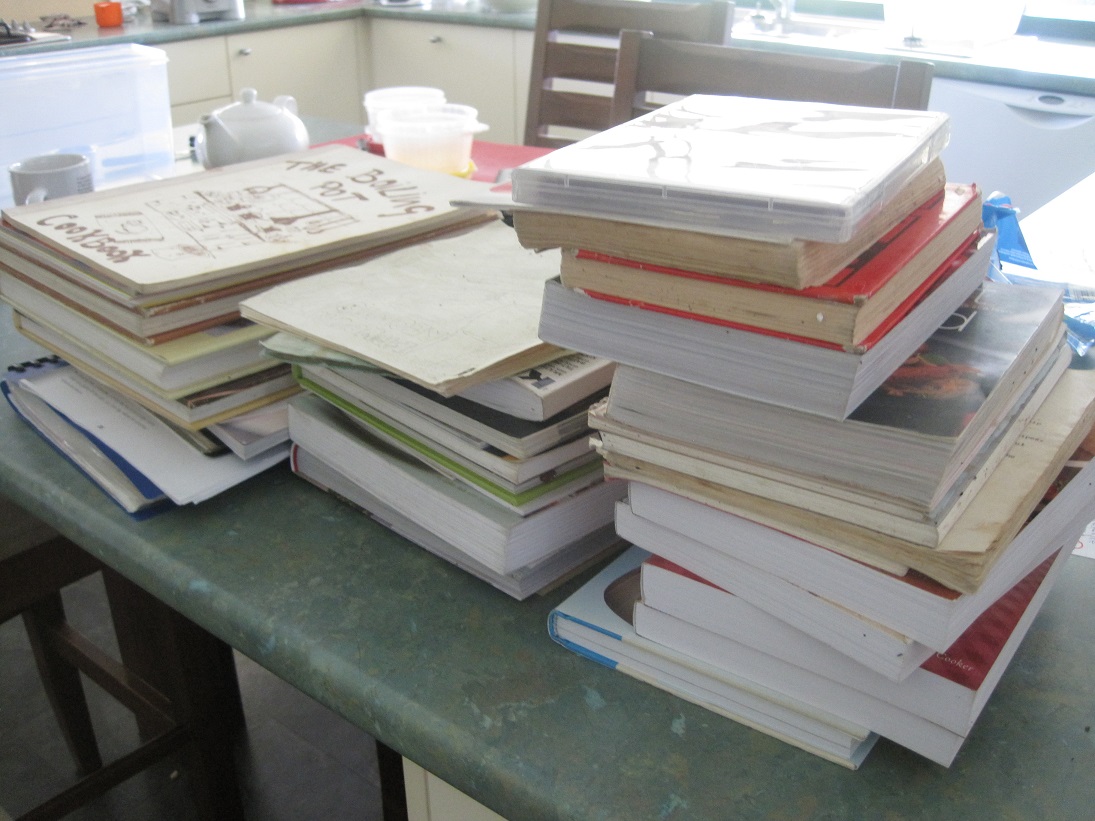
I did not photograph the shelf before I removed all of the books but here they all are on the kitchen bench.

I sorted through and recycled lots of loose sheets of paper – scribbled recipes or ripped out of magazines.  If I had not made them up till now it is unlikely that I will.  Most did not fit with our current eating plan which is mostly gluten-free.  Quite a number of the books were very easy to let go of as they were quite dated and the recipes are simply not to our taste any more.

Ready to go
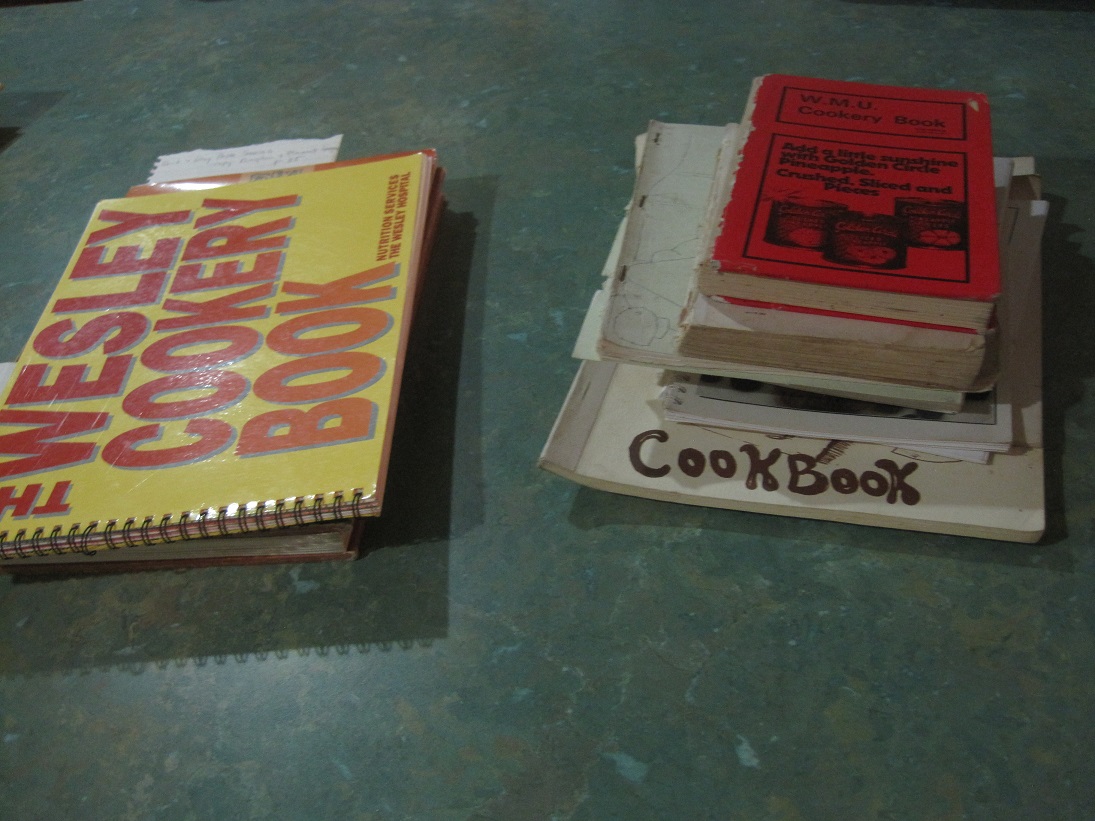
The pile on the right are ready for the op shop bag.  The 3 books on the left each have 1 or 2 recipes which I would like to try, so rather than keeping the whole book, I am going to type them into my recipe file on the computer and then the books will be added to the op shop pile.

I keep two binders with plastic sleeves which are for loose recipe sheets but even these had go a bit out of hand so I spent some time refiling them into the plastic sleeves.

The remaining cookbooks have been returned to the shelf.

Cookbook shelf
Some of these books have barely been opened, let alone actually used so I have promised myself that I will use them.  In order to achieve my goal, I am going through each book and making a list of the recipes that I would like to try and the relevant page number.  I plan to create a spreadsheet of all of the recipes with a reference back to where I can find it.  Today I went through 4 of the books but still have quite a number to go.  It will be an ongoing project.

The Duke suggested that I just scan the recipes that I want to keep and then get rid of the books completely.  That may be an option for the future but at the moment my goal is to actually try out some of the recipes instead of having a shelf full of books that I do not use.

I have a new cookbook on my Christmas wishlist.  It is a gluten-free cookbook.  I have made a couple of recipes from it and if the rest are as good it will be a worthy addition to my pared-down bookshelf.

Project 333 – Making it Work 3

2 Comments

As promised, here are the next 3 outfits based on the black camisole.  This is the one from yesterday where I teamed the camisole with an overshirt and white 3/4 trousers.

Striped shirt 3
Outfit 2 – a completely different look by teaming the black camisole with a black/white check skirt, lacy gold bolero and metallic sandals.

Black camisole 2

Outfit 3 – a simple, summery combination with the addition of a lightweight Hawaiin-print skirt and black slides.

Black camisole 3
I made the Hawaiin-print skirt from fabric that was given to me.  I love the skirt but it is very different to most items in my wardrobe so I have really set myself up for a challenge by choosing it as my base item for tomorrow.

Will I meet my goal of 3 different ways to wear it?

Project 333 – Making it Work 2

6 Comments

Now for the next instalment, using the striped shirt as the base for 3 outfits.

Here is the one from yesterday which I will call Outfit 1.

Green jeans2
Outfit 2 – black trousers, teal/black/white striped collared shirt with 3/4 sleeve and zip front, turquoise cardigan and black mary janes.

Striped shirt 2
Outfit 3 – white 3/4 pants, black camisole, teal/black/white striped collared shirt with 3/4 sleeve and black leather slides.

Striped shirt 3

Because we live in a temperate climate I have the luxury of being able to wear some of the more versatile items in all seasons.  This shirt is a perfect example.

Tomorrow I will show you 2 more ways I wear the black camisole.  There are many options for this piece but I will use the opportunity to introduce a couple of the more challenging items.

Project 333 – Making it Work

Leave a comment

As promised the other day, here is the first of a series about my small selection of clothes and how I make them work.

I read recently that someone expected that every item of clothing needed to be able to be incorporated into 3 different outfits to justify having the item in her cupboard.  I decided to test this theory and here are some of the results.

The first item I chose was my green jeans.

Green jeans1
Outfit 1 – green jeans, red/white striped 3/4 sleeve tee and red flats.

Green jeans2
Outfit 2 – green jeans, teal/black/white striped collared shirt with 3/4 sleeve and zip front plus pewter flats.

Green jeans3
Outfit 3 – green jeans, white camisole, charcoal denim jacket and black mary janes.

The great thing about this exercise is that it actually makes you think outside the box.  I have actually worn outfits 1 and 2 but outfit 3 was created purely as a result of this exercise.  I like the look of it and will definitely try it out.

Some items will easily give you 3 or more options while others will be a bit more of a challenge.  I am not just going to showcase the easy choices.  Each day I will select one of the pieces I used as my next base.  Tomorrow will be 2 more ways of wearing the striped shirt which you saw in Outfit 2 today.

I look forward to hearing your comments on my choices and if you have any strategies for making sure that your wardrobe items earn their keep.

Finally, I want to thank you all for your thoughts and prayers for my sister-in-law.  Her condition remains very serious and we continue to pray for her.

Woodshed – Finished

2 Comments

As you know, we demolished the old chicken run a couple of months ago but left the woodshed which was attached to the end of the run.  There was only chain wire between the coop and the woodshed and this was removed during the demolition process, leaving the woodshed without a side wall.  We had plenty of Colorbond sheeting which we salvaged from the demolition and yesterday The Duke created a side wall.  We also had to add a narrow strip to the roof and then finished it off with some metal angle, also salvaged.

Side of woodshed
The finishing touch was to plant a climbing vine that we bought yesterday.  It is a Richmond Birdwing Butterfly Vine.  I have been meaning to plant one for ages but have not really had the right spot.

Woodshed
I finally finished tidying and sorting all of the wood in the shed.  The wheelie bin is also full of kindling.  All of the wood is now in one place instead of various spots around the garage and under the house as well as the woodshed.

Space
This is the area where the chicken run was so we are planning on extending the area which is planted with heliconias, gingers and bromeliads.  These are currently on the embankment to the left of the photo and we will extend it into the vacant space.  I plan to move some rocks to create a defined edge to the area .  The ground has lots of leaf litter as well as chicken manure and composted vegetable scraps so I don’t think we will have any trouble getting them to grow.

Just to let you know that starting from tomorrow I will be doing a series of posts about the practical applications of having a smaller selection of clothes.  Please join me then.

Furniture Restoration

3 Comments

I do not have photos of each piece but The Duke and I have been busy today, working on 3 different pieces of furniture.

Furniture restoration

The main piece is a silky oak chest of drawers/dressing table which we finally got around to beginning to stain.  We bought it unrestored a couple of years ago and the Duke worked hard to strip all of the paint and sand the individual pieces.  The oval mirror which attaches to the top has been dismantled and that was what was holding us back.  We needed to have it resilvered and there always seemed to be something more pressing to do.  The Duke searched on the internet and found that a large glass and mirror business in the city no longer do resilvering as it is cheaper, easier and more accurate to cut a new one, no matter what the shape or if there are bevelled edges.  We will have the frame stained and take it with the old mirror next week to get a new mirror cut and fitted into the frame.  Once it is finished it will replace the current pine chest of drawers that I am using.

On the left-hand side of the photo is what was originally our TV cabinet which was used by our daughter for a few years and then found its way back home.  Today we have sanded and undercoated it and the finish will be gloss white enamel and it will go in the guest (Air BnB) bedroom instead of the small decoupage desk which is there at the moment.

Finally, there is a pine blanket box standing on its end in the background.  We plan to use this as a storage box on the verandah.  It will hold BBQ supplies and tools and will be painted ‘Woodland Grey’ which is the colour that we will be using for a lot of the exterior trim as well as all of the fenceposts.  We have had this box for over 30 years but it has been superseded in our bedroom by an antique cedar chest.  It had heavy rope handles which we removed and are replacing with metal handles.  We bought them some time ago from Paddington Hardware along with all the new handles for the chest of drawers.  The holes where the rope was attached needed to be filled so I sanded a piece of an old broomstick and cut it into pices to plug the holes.  We overfilled them with Plastibond and tomorrow will sand the box including the Plastibond.

It may take us a couple of weekends to finish them all but I am looking forward to taking photos of the finished articles to show you.

Make & Mend – Shelving

4 Comments

My latest project is something completely different.  I designed and made a piece of furniture.  ‘Furniture’ is probably a slightly too grand to use as a description for the rustic shelving unit which is made from vintage wooden crates and lengths of undressed pine.

Shelving
This creation is the culmination of much discussion over a number of years.  When we first moved into our home in a country town in South Australia we discovered that the large shed held numerous old treasures that had been collected, perhaps even hoarded by previous owners.  Amongst these items were 5 solid wooden crates which had been used to hold explosives.  This was evident from the markings on them.

Box detail
Over the years we have moved house twice, downsized and decluttered many things but the crates, which were someone else’s cast off stuff always managed to make the cut.  The Duke would vaguely suggest that we could use them for shelving and they have often been simply stacked one on top of the other and used to store various things in the workshop.  I had always had a rough idea of a design for shelving which would make the best use of the boxes that we had.  After (yet another) clean-up in the workshop the other weekend my plan finally became clear.  I found 2 identical pieces of undressed pine in amongst the odds and ends of wood. The Duke said that they were part of the packaging on the roll of fencing wire we had bought when we were building the chicken run.  I needed 8 matching pieces for my planned shelving so I asked at the local farm supplier from whom we had bought the wire.  He was happy to give me 6 more pieces that were sitting on a bench out the back of the shop.  The pieces of pine would make the ends and legs for the unit.

Shelving showing the legs
The Duke trimmed the pine to the length required and we then set about assembling the shelving unit using my design which I had roughly sketched on a piece of paper to convince him that it was feasible.

The only cost was $7.00 for some screws. Some were from our stash but we needed to buy more to complete the project.

The shelves will provide some additional storage in the workshop and were a practical way to use the boxes which had been deemed as too good to throw out.  By the way, I checked on eBay and found that similar ones were for sale at between $20 and $60 each.  What is my designer original shelving unit worth?  I would say that it is priceless!


Make & Mend – A New Garden

Leave a comment

Today I made a garden bed, or more accurately refreshed an old one.  Unlike most of my gardening posts this one does not include growing food.

This is an area between the side of the garage and the front steps which originally had a selection of fairly unappealing shrubs and plants.  They had been cleared out some time ago and the space badly needed revitalising.  I did have a before photo, however, it is on the desktop computer which seems to have some issues so I took it to be looked at/repaired today.

Front garden
We bought the plants at a local garden centre on the weekend.  They are Australian natives – low-growing shrubs and ground covers.  The area has quite a considerable slope so I move some more rocks to build up the edges to prevent the mulch washing away in the first heavy shower of rain.  We were lucky to be offered a large pile of mulch by our neighbours who had several large trees lopped and mulched.  We moved 3 loads in the back of the ute last weekend so some of it was used on this garden with several layers of newspaper underneath to help suppress any weeds.

I thought we may have had some rain late this afternoon as the storm clouds were building rapidly and the thunder was rumbling in the distance as I put the finishing touches to my new garden.

Storm clouds

The threatening weather dissipated quickly and we have been left with a warm, humid night.

Make & Mend – Cot Quilt

2 Comments

As promised here is another of the things I have been working on.

On one of my many attempts to sort/tidy/declutter my sewing room I found some offcuts of material.  It is calico with blue teddy bears.  I also had some plain calico.

Material
With no-one particular in mind I decided to make a quilt.  I discovered that I could make enough blocks to make a cot quilt if I added some plain navy blocks.

Patchwork quilt top
The batting and backing were added and the quilting was a simple ‘stitch in the ditch’ where the blocks were joined.

Then it just sat waiting to be bound and finished.  I finally got inspired and completed the quilt.  Handsewing the binding took a little time but I set myself a goal to get it done and here is the finished product.

Cot quilt
I am planning to send it to a friend whose patchwork group are busily making quilts for those who lost their homes in the recent NSW bushfires.  I hope it will help a family in need.

I am very gradually decluttering my sewing room.  It is a gradual process because I do not want to get rid of stuff but rather to use it up.  I plan to make things from the fabric that I have and donate them through various avenues so that others can benefit.