Little Bits

Leave a comment

If you haven’t already gathered from the lack of blog posts, this has been a busy week at work.  The next couple of weeks don’t look like being much better, either.

I have been getting along by just doing a little bit each morning and evening.  There are no major achievements but at least the household hasn’t fallen into complete disarray.

2012-01-20 04We have managed to have a home-cooked meal every evening, packed lunches and a healthy breakfast. I at least partly make the lunches the night before while dinner is cooking.

2012-05-05 04The dishwasher is loaded every day thanks to GMan and it only takes a few moments to unload it.

The washing is done and I have ironed enough clothes to see us through the week.  There are a few extra items that I will need to do on the weekend.  Having the clothesline on the verandah means that I can quickly hang washing out or get it in when we arrive home.  It is then folded and put away.

2013-02-15 02Everything has stayed tidy because there is no-one here to make a mess.

I hope to have something a bit more exciting to share with you on the weekend.

Breast really was the best

2 Comments

This is a newish blog that I have just started reading. There are lots of great posts but this is a really special one that deserves to be shared.

Thank you, Anne.

Anne's avatar

My favourite breastfeeding photo. My favourite breastfeeding photo, graduating university and feeding my daughter

About 28 years ago I was privileged to become friends with a fantastic group of women.  We were all new mums, learning the tiring, challenging and beautiful art of mothering together.  We were passionate about our role as mothers and were all members of the Nursing Mothers Association, now the Australian Breast Feeding Association. I can’t remember what I learnt at our regular meetings but I well remember the support, understanding and bond I shared with these women.  On the days that I doubted my ability and when I felt as if I was going crazy from lack of sleep they were the ones that made the tea and passed the tissues.

We all breastfed our babies.  The five of us suckled 14 babies.  We weathered

View original post 415 more words

Sew My Stash Sunday – 13

Leave a comment

The black lawn to line the yoke of the blouse has been bought, cut out and pinned to the yoke pieces.  That is where the sewing stopped for this week.  A birthday celebration and houseguests, including grandchildren put paid to any more sewing.

However, there has been some activity in the sewing room.

I found a use for this set of mini-drawers which came from my mother.  They are now on my sewing table and contain various small sewing items.

2015-04-12 01Next, I repositioned this chest of drawers to sit under the table.  I don’t know why I hadn’t thought of that before.  I previously had to move them, and they are very heavy, every time we needed to pull the trundle bed out.

2015-04-12 02Finally, I did do some fabric work this afternoon, although it was not strictly sewing.  I started cutting some old t-shirts that i got on Freecycle into strips.  My plan is to make a plaited floor rug like this.

I have plaited this piece which is about 8 metres in length, so far.  I will need quite a bit more before I have enough so keep watching for the finished article.

2015-04-12 03The stash has grown rather than shrunk this week as I was given some fabric by a work colleague.  More about that another time.

Flashback Friday

2 Comments

Here is one I whipped up earlier.  Four years ago, in fact.  This post with a video of how to fold plastic bags is one of my favourites.  Please let me know what you think.  Do you use this method?  Will you give it a try?  I find one of these takes up next to no space in my handbag and it is useful to have one on hand.

In the first days of this blog I posted a link on ‘How to Fold a Plastic Bag’ Here it is again for anyone who missed it.  This really captured my interest. I have two bags hanging inside my laundry cupboard where I store reused bags which I use constantly but I had another lot in the cupboard in the spare room which needed a better way of storing them.

2011-03-25 01I decided to try my new-found skill on this lot.

2011-03-25 02All folded on the bench – now for how to store them.

2011-03-25 03The only thing left to do is to put the box back in the cupboard.

Celebration Central

4 Comments

April is quite a month for celebrations in our family as it was our wedding anniversary earlier in the week and will be followed up by my birthday later in the month.

It is my brother’s birthday today and we will be going out for a family lunch on Saturday to celebrate.

This year is a milestone birthday and here are some past photos of the birthday boy.

Owen Owen2 Owen1Wishing you a wonderful birthday and best wishes for the future.

Permaculture Principles or Plain Commonsense

4 Comments

Whatever you want to call them, there are things we can do in the garden that will save money and resources.

Here are a couple of projects we have been working on this weekend.

2012-08-05 01
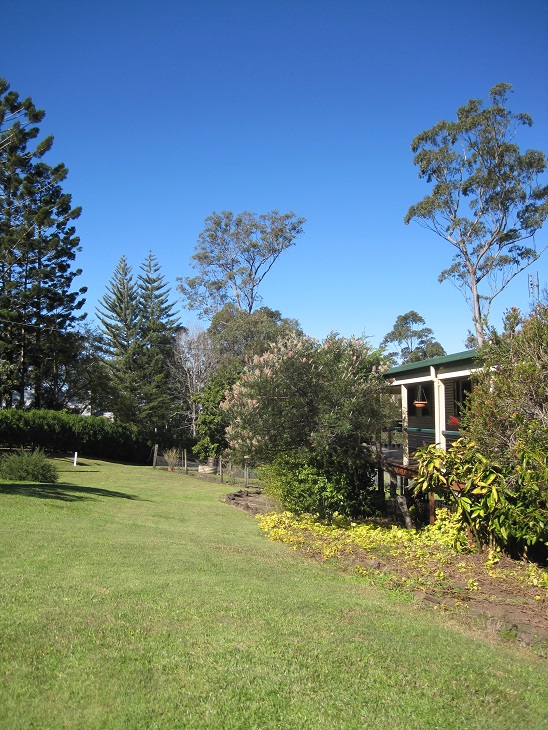
When we came here there were numerous shrubs/small trees planted close to the front verandah.  They provided some screening and privacy from the road.  Over time we planted a screening hedge of native shrubs along the boundary so the ones closer to the house became less important from a privacy point of view.  We extended the area in front of the verandah and slightly reduced the amount of lawn.  The shrubs have been pruned several times to try to keep the blow the level of the gutter.

Last year I decided on the final format for this area.  We will have a selection of flowering hibiscus in front of the verandah.  We bought 5 hibiscus at the Garden Expo in July last year and they have been progressing well.  However, one of them was beginning to struggle and we realised that it was being shaded by one of the grevilleas.  We cut down the three remaining shrubs, mulched everything that was small enough to go through the mulcher and cut the bigger branches into manageable lengths.

2015-04-06 02While Gman was mulching Istarted laying out newspapers (usually about 6 sheets at a time) and hosing them down to stop them blowing away.  The we piled the mulch we had made at one end.

2015-04-06 03This shows a close-up of the small logs that we used to create the back edge of the area to be mulched.

2015-04-06 04
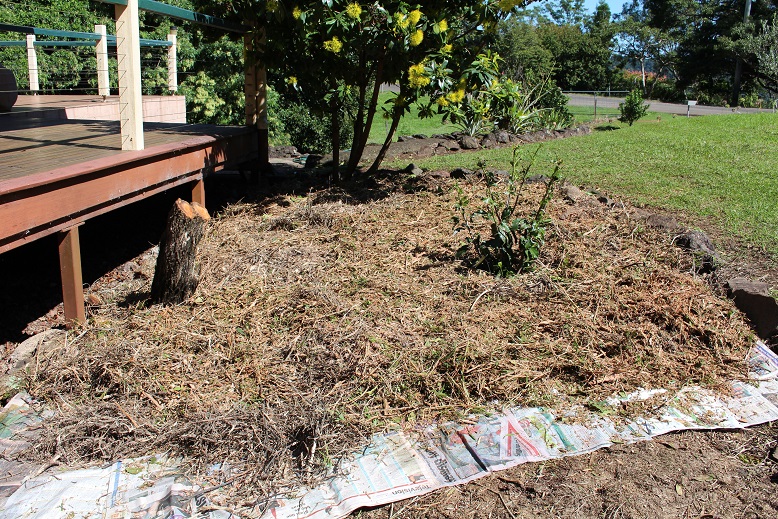
Here is the mulch spread out.  It was convenient that we ran out of mulch and newspapers at about the same time.  We are going to bring home whatever newspapers we can collect from work in order to continue our project.   There is still quite a bit to do as you can see from the next photo.

2015-04-06 05You can also see some of the hibiscus.  They seem to really be enjoying the full sun now that the overhanging shrubs have been cut down.  We have been offered a huge pile of mulch from the neighbours so that will go towards completing the mulching of this area.  The next job will be to buy some more hibiscus.

2015-04-06 06Finally, I wanted to show you the garden bed that I started last weekend.  It is now dug over, edged with rocks and seeds planted.  We have no shortage of rocks as they are everywhere on the block in all shapes and sizes.  I have planted sweet pea, snapdragon and heartsease seeds in the hope of having a border of colourful spring flowers.  The sweet peas are in a furrow close to the fence which will do double duty of keeping unwanted animals out of the vegie garden and being a trellis for the sweet peas.

Sew My Stash Sunday – 12

2 Comments

I am pleased to report that I have actually finished something.  Remember this trial from a couple of weeks ago?

2015-03-22 02Well, I went and bought the silver/grey lawn to line the front yoke.  It cost me the princely sum of $1.80.  I then made the top with one slight alteration from the original pattern.  I made the front 8cm narrower as I felt there was too much fullness in it for my liking.

2015-04-05 02It was simple and easy to make and has no fastenings of any kind.  I am really pleased with the look of the finished garment and am looking forward to wearing it.  It is easy to forget that this was only ever a prototype so it is an added bonus that I get a pretty top to wear as well.

Buoyed by the success of my trial I was ready to cut out the next top.  Here are the pieces cut out and ready to sew.

2015-04-05 03

As with the first top, I need to buy some lawn for the lining of the yoke and the back neck facing so that is on my ‘to do’ list for this week.  I would normally use the same fabric for the lining and facing, however, in both of these instances the fabric is so fine that the pattern from the lining pieces could show through and disrupt the look of the finished garment.

Flashback Friday

1 Comment

As with all new projects, ‘Flashback Friday’ is being fine-tuned.  As well as linking back to the original post I am going to copy and paste it into a new post.  So, here goes…..this is from August 2012 just before Izz turned 3.

I have been making a gift for Izz for her birthday.  She has a doll’s bed which has been passed down to her but no bedding.

I bought 2 u-shaped pillowcases recently from the op shop.  Here is one that I have unpicked ready to use.  Note the roll of fabric which is the dismantled and pressed frill.

2012-08-06 01The Duke bought a piece of foam cut to size for the mattress and I have covered that using some of the pillowcase fabric.

2012-08-06 02The next step was to make a patchwork quilt.  I worked out the size and number of pieces I would need.  The plain pink is more of the pillowcase, plain mauve from a piece in my stash of fabric, Dora pattern is a few leftover scraps from the doona cover and curtains that I made for Miss O last year and the pink patterned fabric is from a blouse I picked up at the op shop.  The frill is the one I unpicked from the pillowcase.  The hemmed edge remained intact so I simply regathered it and reapplied to the quilt edge.

2012-08-06 03I bought a large piece of cotton/bamboo batting for a bed quilt I am working on for Izz’s bed so I used a small piece for this quilt.  (I think this is a rather spoiled doll!)  The backing is more leftovers from some op shop fabric.  I quilted it by simply machine stitching along the seam lines which is nothing fancy but seems effective.

2012-08-06 04The finishing touch was to make a matching pillow.  A couple more fabric scraps and some salvaged filling from an old cushion and I had a complete set of bedding for the doll.  Here is the mattress with the pillow.

2012-08-06 05The total cost of things I bought specifically for this project was $6.60.  This is a gift which I know will be loved regardless of the cost.  I am looking forward to seeing Izz’s face when she opens the gift.

Now I need to work on the the bed quilt I am making as well since her birthday is in 2 weeks and I want to be able to give her the present before we go on holidays.

2015-04-03 01In the interests of presenting a complete picture here are a couple of photos I took when she received her parcel.

2015-04-03 02