Struggling?

Leave a comment

I read a post on Facebook this evening about a news report of households with an annual income of $200,000 struggling to make ends meet.

Payday

The responses were many and varied as you can imagine.  My contribution was to point out that living pay cheque to pay cheque can be a reality no matter what your income may be.  If you expenses are greater than you income you will struggle.  It is that simple.

There is no easy formula to being comfortable.  It can depend on a range of things such as your location, circumstances, skills, education and ability to manage your finances.

Here is the article.  What do you think?

Another definition of rich.

The Gorgeous Garden

Leave a comment

This weekend GMan and I have had 3 days at home so finally managed to catch up on some much needed work in the garden.  We have had a combination of plenty of rain plus some hot, sunny days over the past few weeks which has been a recipe for everything to grow crazily – especially the weeds.

Thankfully, the weather was not too hot and mostly fine this weekend.  GMan ploughed through everything on the mower and now I can actually see the vegetable garden area again.

2016-02-14 01

We also had a blitz in this area in front of the verandah.  The hibiscus we planted last year are doing really well and I think we need about 3 more.

2016-02-14 02

The weeds were going mad and there were piles of branches waiting to be mulched.  The mulching has been done and weeds mostly pulled up and discarded in the compost heap up the back.  The thickly mulched area in the background of the photo with cardboard/newspaper underneath has very little weed so we definitely need to get more mulch and finish the whole area.

This afternoon GMan planted the capsicum plants we bought last weekend and the 4 shrubs we bought at a new native plant nursery in Maleny.

2016-02-14 03

The plant in the foreground was a Christmas gift and has more than doubled in size in the 6 weeks since we planted it.  The one up closer to the road was also planted towards the end of last year.  The new plants are barely visible in the photo but can be identified by the areas were the lawn has been dug up.

Although it is not clear in the photo, this is quite a steep embankment and difficult to mow.  So, we have decided to cover the entire area with native shrubs and groundcovers.  Nothing will be more than a couple of metres high and we hope to have it densely covered and eliminate the lawn in this area entirely.  It may seem like a vain hope when you look at it now but here is a reminder of what can be achieved.

2016-02-14 04

This planting is along the front boundary a provides privacy from the road.  The whole area was just a wide expanse of lawn when we came here 10 years ago.  It took about 4 – 5 years to get this level of screening.

We have many grand ideas for the garden and look forward to getting more done but in the meantime it is gratifying to see how much we have achieved.  The chicken run, vegetable gardens and fencing in the first photo have all been established since we came here, the area in front of the verandah has been completely revamped and the native screening grown.  Many other areas of the garden tell a similar story.

I hope you enjoy seeing some snippets of our garden.

Loads of Laundry

1 Comment

We live in a relatively high rainfall area and I have written before about the challenges of getting the washing done, and more importantly, getting it dry.   I do have a clothes dryer but choose to use it as little as possible.  Apart from the power required to run it, the wear and tear on your clothes is significant and can result in substantially shortening their lifespan.

Despite the high humidity and showery weather, I needed to do the washing today.  Much like women of previous generations, I spent the day doing the washing.  However, I was not slaving over a scrubbing board and copper.  I was kept busy trying to make the most of the intermittent breeze and small snatches of sunshine.

I hung some of the smaller items on the airer.

002

I had to race out and move it under the verandah every time a shower of rain started but I did manage to get it dry.

The rest of the clothes were hung on the line under the verandah.

003

I also did the ironing from the washing I did last weekend.  When the atmosphere is so damp, I do not like to put them away in the cupboard until they are absolutely dry.

I use the portable dehumidifier in the bathroom and close the door.  Within a couple of hours the room and the clothes are warm and dry.

001

I also have a portable rotary clothesline and in the cooler months I hang washing on it and the airer and set them up in the lounge room in front of the fireplace.

There are many options for drying clothes.  What are your creative solutions?

Stocking Up

1 Comment

I have spent today in the kitchen but most of it was not preparing meals.  It was about making and bottling jam and sauce.

There were 6kg of cherry tomatoes squirreled away in the freezer ready to make sauce and today was the day.

2016-01-10 01

The recipe for the sauce is here.

Next up was the 10kg bag of onions I bought yesterday.  I set 2kg aside for a friend and then sliced and diced another 7kg and have packed and frozen them.  I decided to turn the last kilogram into onion jam and the taste test indicates that it has been successful.  The recipe I used had carraway seeds in it so I bought some this morning when were shopping.  I have never bought carraway seeds before but if it looks as though I will be making onion jam in the future I will definitely get some more.

2016-01-10 02

Finally, I made some plum jam which is GMan’s favourite.  It turned out better than the batch I overcooked last year which was closer to toffee than jam!

008

The recipe is very simple.

1.5 kg plums
1.25kg sugar
Juice of 1 lemon
1 cup water

Place in saucepan, boil until setting point is reached.  The stones can be removed with a slotted spoon during cooking.

Tip:  Count the plums before you start so that you know how many stones you are trying to remove.

I also made another batch of spreadable butter.  Here is the recipe.

2016-01-10 04

The only problem with cooking all day is that I did not get the ironing done!  However, we do have ironed clothes to wear to work tomorrow.


Hen House

3 Comments

In 2013 I wrote this post about a chicken coop we had bought.  While it has been quite successful it has succumbed to the weather over time.

Once we had completed the run we decided that we would really prefer to have a hen house that we could access by walking in to it.

There had been much discussion about how we would make this a reality so last weekend we set to work with our salvaged and recycled materials from the old hen house and other projects.

We worked flat out for 2 days and there was no time for taking photos so there is no record of it under construction.

Here is the finished structure.

007

There will be covered garden beds around 2 sides.  I plan to grow greens for the chickens to graze on but have it covered so that they can only nibble them once they grow big enough that they are through the wire.

008

This is the view from the vegie garden.  It is not open to the garden although that is the effect in the photo.  There is chicken wire on the front side of the hen house.  We are considering adding a roll-down clear vinyl blind to use in very wet weather.  There are a couple of old ones which we do not use that are still on the verandah.

004

The interior with water and feed dispensers as well as a nesting box which we salvaged from the old coop.

There are still a few minor enhancements that we will make but the major part of the project is complete and the chickens seem very happy with their new home.


Running Repairs

Leave a comment

Both GMan and I have have some really old clothes which we wear when we are gardening or doing other outdoor jobs.

Last weekend we were busy building a new hen house and we both managed to cause some damage which necessitated some mending.  After the clothes were washed today I set about repairing them.

Here are the ‘before’ shots.

2016-01-06 01

I ripped a 3 cornered tear in the back of my cotton trousers.  They are very thin and some would say they are not worth repairing.

2016-01-06 02

Gman’s patched trousers had a different problem – the stitching of the crotch seam below the zip gave way.  I think the thread had just worn out.

Here is a close-up view.

2016-01-06 03

I started with my trousers and placed a patch on the inside using double-sided iron-on interfacing.

2016-01-06 04

Zig-zag stitching over the tear plus around the edge of the patch and the job was complete.

2016-01-06 05
This is the view from the right side.

2016-01-06 06

For the crotch seam I sewed a seam from the wrong side and then 2 rows of stitching from the right side.  Like many of my mending jobs, it won’t win a prize but it is effective and extends the life of the garment.

2016-01-06 07

Do you mend clothes?


A New Hat

2 Comments

GMan always wears a hat when he is out in the garden.  The one he wears is a cloth one which has seen better days and only has a relatively narrow brim.  On several occasions we have looked at broad-brimmed straw hats but they never seem to be quite the right fit.

Today we were in the local hardware store and he tried some on.  We found this one which was perfect – except it did not have a chin strap.

2016-01-02 01

I assured him that I could make a strap without any problem.  I was not sure whether I had any cord at home but when I checked my collection, I found some red cord and a toggle that I had saved from the drawstring on a fleece top which had worn out.

2016-01-02 02

I threaded the cord around the base of the crown on the outside then passed the ends through to the inside, attached the toggle and tied off the ends.  The cord sits under the band on the outside so is not visible.

GMan is very pleased with his new hat and very happy with the chin strap which I created in about 5 minutes using things that I had on hand.


Tomato Trial

1 Comment

I apologise for the break in posts but my computer access has been somewhat curtailed due to some repairs to the main computer.  It is all resolved, thanks to the local computer shop, and we are back in business.

Today I want to share my latest success in preserving our bumper harvest of cherry tomatoes.

After removing the stalks and rinsing the tomatoes, I blitzed them in the blender.

My dehydrator has solid sheets for making fruit leathers so I poured the resulting puree onto the sheets.

001

Here is the same tray after drying for about 8 hours.

002

I removed the dried tomato and broke it up.

003

It was quite leathery and pliable so still had some moisture.  I returned the pieces to the dehydrator and dried them some more.

004

Finally, I ground the dried pieces in the blender and this is the result.

002

From a couple of kilos of cherry tomatoes I have 1 jar of powdered tomato concentrate.  This can be blended with water to make tomato paste which I can use on pizzas or added directly to casseroles or soups.  I am sure there will be a hundred and one uses for it and the great part is that I have a single jar which stores easily in the door of the refrigerator.

Storage from the Sun

5 Comments

When I wrote this post last month, I mentioned that we were getting a battery system for our solar panels.

Well, the installation was completed on Tuesday afternoon and since then all of our electricity consumption has been independent of the grid.

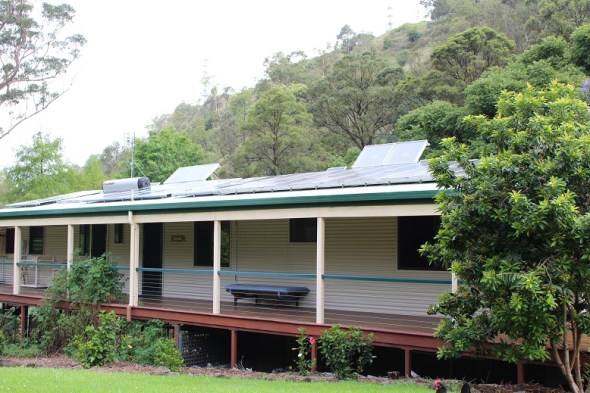
As well as the battery system we also have more panels.

004

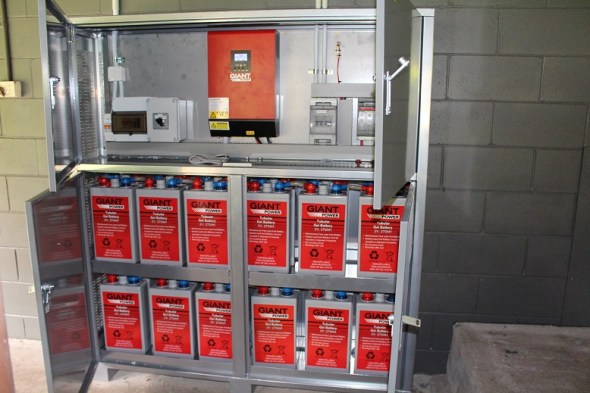
This is the cabinet which holds the batteries.

002

Inside, it looks like this.

003The interesting thing about the system which we have is that it is a hybrid system.  In fact, we really have 2 banks of solar panels – the original ones which we have had for 5 years remain connected to the grid and any power generated is fed back to the grid with a monetary return to us.  The only things that we have connected to this system are the oven and a single outdoor power point.

Everything else is powered by the solar panels of other system during the day and at night by the excess which is stored in the batteries.

This also means that we can power our home from the batteries (except for the oven) during any periods of power outage.

Following the completion of the battery installation on Tuesday, we have had four brilliant, sunny days.  The screen shot below shows our generation and use and tells the story clearly and simply.

001

This shows the last month and each bar is one day.  The yellow bar shows the solar generation, the green line is power exported to the grid, the red line is our consumption and the black bar is power drawn from the grid.  The last 4 days are since the battery system has been operational.  Our solar generation is higher (we now have more panels), 100% of what we generated from the grid-connected panels was exported to the grid and most importantly, we have not used any power from the grid.

I know that every day will not be clear and sunny nor will we have as many hours of daylight as we are getting at the moment as we head towards the summer solstice.  However, we are confident that we will continue to be able to supply our power needs independently of the grid.

There are numerous new technologies available for battery storage systems so it would pay to very carefully consider your circumstances before rushing into a decision like this.  However, if you live in Australia and are interested in more details about our system please email me and I can get some information for you.

A Simple Storage Solution

4 Comments

Several years ago we bought 2 free-standing hanging racks.  They were for our daughters who were both living in accommodation that had no built-in wardrobes.

Fast-forward a few years and their circumstances changed and the hanging racks both ended up at our place.  One was boxed up in the garage and after a while I sold it on Gumtree.  The other was quite useful as I had it in the spare bedroom/sewing room.  I also use it to hang clothes waiting to be ironed or wheel it into the lounge-room to dry clothes in front of the fire during winter.

2013-02-15 02

I am working hard to streamline my sewing room and reduce the general clutter.  When I sold the small chest of drawers that had previously lived in the wardrobe it meant that I could use the hanging rail in the wardrobe for the ironing that was yet to be done.

The hanging rack can be dismantled but it is difficult to store.  I am not ready to part with it yet as it is useful during the winter months.010I decided to make a storage bag.  I found some pieces of very strong cotton fabric in my stash and fashioned a bag which was big enough to hold all of the pieces.  I added a couple of ties and it was finished.

009Here are a couple of photos showing the finished article doing its job – holding the disassembled hanging rack.  I simply tied the ties in a knot over the rail at the desired length.

011 012Now I am off to do some more sorting in the sewing room.

Have you got any creative storage solutions?  Please share.