Making Progress

5 Comments

In amongst various other jobs I managed to do some sewing this weekend.  I had some patchwork blocks I had made ages ago with nothing particular in mind so I decided to put them together to create a small quilt.  It will be given to a work colleague who is pregnant with a baby girl.

2016-12-11-01

Here it is draped over the ironing board with the batting and backing attached.  I have begun stitching it together by machine stitching along the joins of some of the blocks.

I know that my techniques are nothing like quilters would use, but it is made entirely with scraps, offcuts and thrifted fabrics and a generous dose of love and care.


A Touch of Luxury

2 Comments

Tonight I had a quick rummage in my stash and found a couple of offcuts of silver panne velvet.  This was perfect for my latest project. I wanted to make some little presentation pouches for the pieces of upcycled jewellery which I have for Christmas gifts.

It did not take much fabric or time to make these up.

Packing the contents.

2016-12-08-01

All done and ready for giving.

2016-12-08-02

Rather than trying to create drawstrings, I decided to anchor the ribbon tie with a few stitches on one side of the pouch and then simply gather it up and tie.

The satin ribbons came from my collection.  The black and cream ties are bits salvaged from when I cut them off the shoulder seams of purchased tops.

Finally Finished

3 Comments

It is 2 months since I wrote this post about buying the fabric to make a new cover for the day bed.  I had made a small start a few weeks ago but today I started seriously sewing.

I have now finished the cover apart from the fasteners for the straps which will hold it in place.  I will buy some more this week.

Here is the end result.

2016-12-04-01

As described in my earlier post, the other side is vinyl so that I can leave it reversed when not in use so that if the cat sleeps on it the cat hair will be easy to remove with a damp cloth.

2016-12-04-02

I am very pleased with the result and the colours match the other furniture and details on the verandah.

Finally Finished

4 Comments

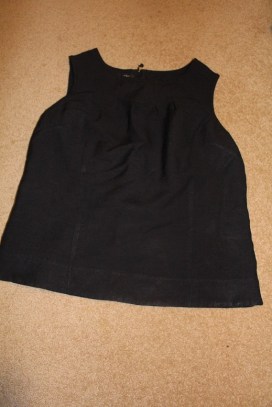
I finished making a top for myself which has been a long, drawn-out process.  I bought the material about 3 years ago because it caught my eye.

2016-10-23-01

Am I happy with it?  Not entirely.

Will I wear it?  Definitely.

What is there not to like?  It is a bit on the short side but still wearable.  The style is too boxy so I would not make it again.  I would prefer something with more shaping through the body of the garment.  However, the fabric I used is a knit but does not have a lot of stretch so probably would not work in a more fitted style.

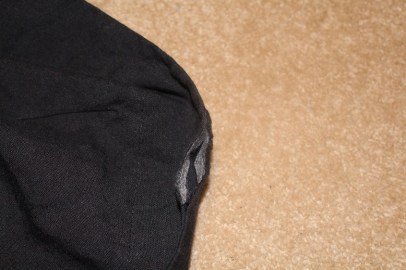
I am happy with the final finish on the v-neck which was my own creation.  I did have 3 attempts before I was satisfied.

I have been making clothes for the best part of 50 years but I still struggle with sewing knit fabrics, in particular, getting a professional-looking finish on necklines and hemlines.  I have never owned an overlocker and continue to vacillate about the value of them.  Would it make a real difference to sewing knit fabrics?

Since the spotted fabric did not have a lot of stretch, I managed a hem that looked acceptable.  I then turned my attention to a plain navy top which I bought in Canada.  It ticked almost all of the boxes – navy, v-neck, fitted style – the only thing wrong is that it was too long on me.  It was quite a bargain so I decided to buy it despite the length as I felt that I would be able to shorten it.

I did the alteration but due to the fact that the fabric has some elastane in it and consequently more stretch, the finish is less than perfect.  Once it was pressed it is OK and I will wear it but I still feel a degree of disappointment in the result.

2016-10-23-02

I really want to be able to make my own v-neck and scooped neck fitted knit tops in a range of sleeve lengths from sleeveless  and short sleeved to 3/4 sleeve and long sleeved versions that are the correct length in the body for me.  This would allow me to choose colours and designs that I like and not be limited to the range which some fashion buyer has deemed will be available this year.

Would an overlocker help, do you think?  All comments gratefully accepted.

Meanwhile, I will go back to sewing garments from several pieces of woven fabric which are awaiting my attention.

No Excuses

3 Comments

I enjoy sewing and for the first time in my life I have an (almost) dedicated sewing room.  However, despite my grand plans I have done very little sewing in recent times.

There always seems to be something more pressing to do – cooking meals, washing, ironing, gardening and so on.  When I sew, I like to do it to the exclusion of the everything else so I have tended not to do it.  The ironing always takes precedence over sewing, especially since I have the ironing board set up in the same room.

Anyway, there can be no more excuses as I have finally got the space pretty much as I want it.

The bed is completely free from any piles of clothes waiting to be folded or ironed.

2016-10-05-01

The wardrobe is cleaned and tidied.


All of my sewing stuff is sufficiently ordered that I can locate what I need.  The iron and ironing board are ready to use.

2016-10-05-04

The sewing table looks untidy but much of it is projects waiting for some action.

2016-10-05-05

My first priority is mending (socks) and some alterations.  I need to take up the hem of trousers I bought in Canada as well as shorten a top I bought there, too.  Next, I will complete 6 pairs of boys shorts which are partly made and are destined to be donated to those who need them.  There is plenty more after that, including, finishing a long sleeved blouse for my daughter, the cover for the mattress on the day bed and dresses and tops for myself.

I will make time to sew.

Buying for a Bed

4 Comments

It is 4.5 years since I wrote this post about covering the mattress on an old bed to use as a day bed on the verandah.

Unfortunately, it did not quite turn out as I had planned for a couple of reasons.  Firstly, the cat thought I had made it for him and proceeded to lie on it regularly and blanket the entire surface with grey fur.  Secondly, I realised that it was directly accessible to anyone entering our property and I would not feel secure being asleep there.

The second issue has been addressed somewhat by having a lockable gate installed.

2016-09-07 03

However, the problem of the cat remains.  I have considered this for some time now and decided that the best option was to have fabric on one side and vinyl on the other.  I will keep it vinyl side up generally so that any cat fur can be easily wiped off but turn it over to the fabric side when I (or anyone else wants to lie or sit on the bed.

Since the original post, we have painted the bed frame in a dark grey (the same colour as the surround of the gate in the photo above).  Additionally, the outdoor table is now red.

2016-09-12-01

I had an idea that I could incorporate these colours into my new plans for the bed.  So, today when I was shopping I went to Spotlight and was surprised and delighted to find exactly what I was looking for.

2016-10-01-01

The plain black vinyl will be for the cat while the stripe fabric which was described as ‘outdoor canvas’ will be perfect for the fabric side.  I should have enough left to make a couple of cushions, too.

I was really pleased to find exactly what I had imagined and I am looking forward to getting it made and ready to use.

The Ironing Makeover

Leave a comment

As I mentioned in my last post, the ironing board cover really needed replacing so I made that project a priority for today.

I do not have a ‘before’ photo but I can assure you that it was ripped in a couple of places, very thin and badly stained.

Here is the new version which I made from a sheet which was no longer being used.  The fabric is strong cotton that I bough and used to make a fitted sheet several years ago.  I cut two layers for extra strength.  The inside layer is cotton/bamboo batting.

2016-09-30-01

The straps, velcro and binding around the edge were all salvaged and re-used from the previous version.

2016-09-30-02

There are a couple of old layers from previous purchased covers which are under the new cover.  It is firm but well-padded so a great surface for ironing.

2016-09-30-03

I use 2 straps underneath the board to hold it firmly in place.  You can see one of them here.

With a new iron and fresh cover for the board I am ready to do the ironing.  Like most tasks, it is made easier with the right equipment.

No Repairs Today

2 Comments

While I am prepared to have a go at repairing almost anything, there are some things that only have one destination at the end of their life and that includes small electrical appliances such as irons.

I was almost finished the ironing on Sunday when I realised that the iron did not seem to maintaining its heat. On closer inspection I discovered that it was not on and that we had lost power on one circuit.  A bit of judicious testing revealed that the iron was malfunctioning and tripping the circuit breaker.

So, the old iron has been discarded and I bought a new one on Monday.

2016-09-28-01

I expect that when I do not have business attire to launder for both of us that my ironing pile will decrease significantly but for the moment an iron is absolutely essential.

Now, I just need to find time to make a new cover for the ironing board as this one is now worn out.  It is actually close to 2 years since I wrote a blog post about the fact that it was about to wear out.

I really must do something about it this weekend.  The new iron deserves a new cover on the board!


Somewhere Different

1 Comment

We have been to Melbourne for a couple of days.  The reason was to visit our daughter and celebrate her birthday.  However, I managed to sneak in a spot of shopping.

Last year I got rid of my knee-high black boots as the heel was simply higher than what I was comfortable wearing.  I had been debating for some time about replacing them and I finally found a pair that I was happy would suit my needs.

2016-06-12 01

I wore them for most of the past two days, including quite a bit of walking and they are very comfortable.  I am really pleased with my purchase and expect they will last me quite a few years.

My other purchase was at a small, independent fabric shop in the northern suburb of Ivanhoe.  There were lots of beautiful winter fabrics but I bought a piece of linen to make something for myself next summer – probably a blouse of some description.

2016-06-12 02

I fell in love with the colour and pattern of this piece and am sure it will make a gorgeous garment.


Disappointed

Leave a comment

I was doing the ironing today and one of the items I ironed was a black linen top that I bought in Melbourne when we were on holidays in December.

2016-04-07 02

I noticed that there seemed to be a small segment of frayed fabric on the bottom edge.  On closer inspection I discovered that that bottom has a facing rather than a turned hem and the fabric had been trimmed too close to the stitching leaving next to no seam allowance.

2016-04-07 01

Thanks to my spreadsheet tracking what I wear, I know that I have worn it 4 times.  This is not a $5 top and I am really disappointed that this has happened.

I could toss it in the bag to go to the op shop but I have decided to take responsibility and mend it.

My first thought was to align the edges and zig zag it together using a fairly short stitch.  This would be far from invisible but fairly effective.  The section in question is on the bottom edge at the back of the garment.  Alternatively, I could unpick the topstitching to access the section from the inside and restitch it.  My concern with this approach is that it could create a noticeable dip in the edge.

How would you approach this mending task?