Made from Scratch

Leave a comment

I have previously written a post about making your own pasta from scratch.  Barely 6 months after I wrote this post I made the decision to eat a gluten-free diet for the sake of my health.  The pasta making attachment has languished at the back of the pantry and I keep promising myself that I will try making my own gluten-free pasta.  Well yesterday was finally the day.

After searching the internet and using some ideas gained through making other gluten dough such as pizza bases, I decided to give it a try.

Here is my recipe:

2 cups gluten-free flour
1/2 teaspoon salt
10g psyllium husk
3 eggs
25ml water
25 ml olive oil

2012-01-31 01Combine the dry ingredients, add the eggs and then gradually add the water and oil.  The mixture will not roll into a ball as it does if using wheat flour but it should be damp enough that you can squeeze it together in your hand.  Mix thoroughly for about 3 minutes.  Cover bowl with a damp teatowel to retain the moisture and work as quickly as possible.

Take a small ball of dough and knead well in your hands, press out into a thick disc and feed through the pasta roller on thickest setting.  The dough will crumble but persevere and do it several times until the dough starts to feed through in sheets.  Continue to fold and feed through until you have a good consistency and then feed it through progressively thinner settings.

003
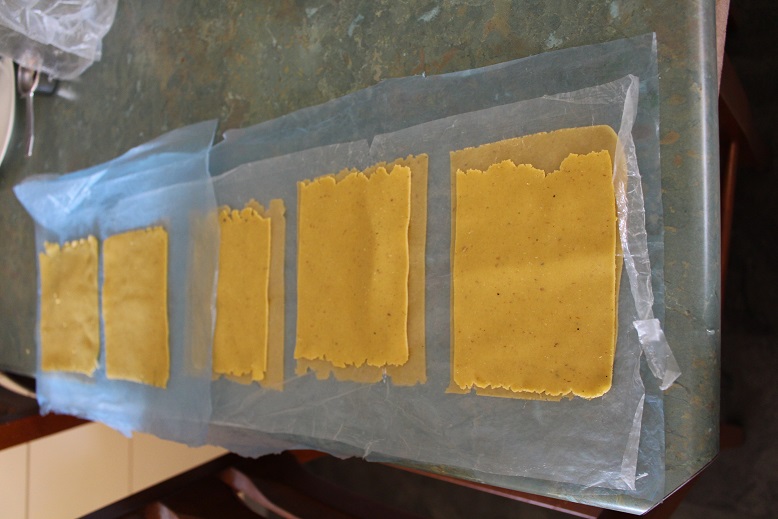
Once you have the thickness that you want you can cut it into lasagne sheets or attempt the next step of making fettucine.004
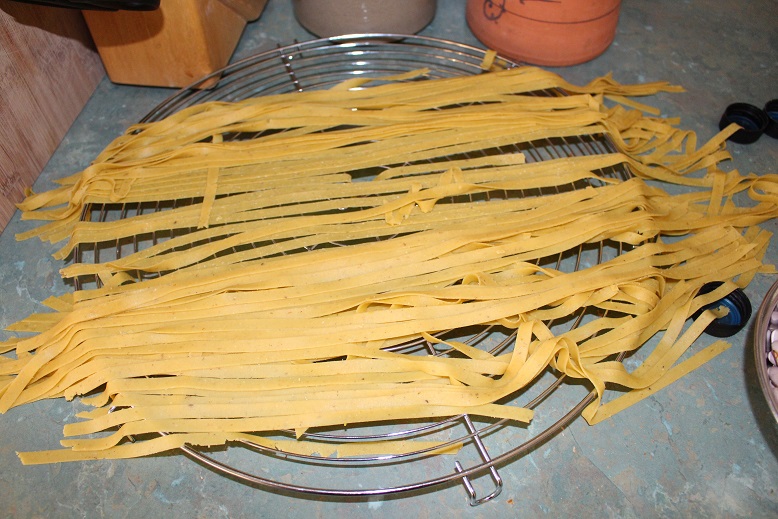
It is certainly more difficult to make than conventional pasta but I am hoping it will be worth the effort.  Both the lasagne sheets and fettucine have been frozen so the final verdict will be when they are cooked.  I am very confident that the lasagne will be successful but I will have to wait and see with the fettucine.

Based on what I have done so far, I would say that this has been a worthwhile exercise and I will tweak the recipe further if required.

Watch this space………..

Seasonal Jobs

Leave a comment

Summer is gone and today was a sign of things to come.  Although many of you would scoff at our version of winter it is a clear contrast to our hot, wet summers.

Winter is heralded by cool clear days, cooler nights and a biting westerly wind which can make the apparent temperature seem much less.

Autumn foliageThe leaves have turned and are falling so it was time to gather some firewood as our wood-burner is the only form of heating we have in this house.

We retrieved the dry logs from the woodshed.  These were leftovers from last season.

002This box is right beside the door that leads upstairs.

003And some more under the house.

We are now ready for when we decide to light the fire.

FireplaceGMan has chopped another pile that was by the bottom gate and these are now stacked in the shed to dry out.

Salvaged and Spread

1 Comment

Now that the weather has finally moderated it is a great time to be out in the garden.

2015-04-18 01We took the ute up to the neighbour’s place to collect the first of 2 loads of mulch that they had kindly offered to us.  This was from when they had some trees trimmed and mulched about a month ago.  Although we have had some light rain in the past day or two the ground was not too wet and GMan was able to bring the ute close to where we wanted to use the mulch.

The newspaper collection has been replenished somewhat, thanks to the generosity of friends and also some that GMan collected from his office.

2015-04-18 02Once again, the newspaper and mulch covered pretty much the same area.  We now have more than half of the front garden deeply mulched.

2015-04-18 03Here are the first of the sweet pea seedling peeking their heads through the soil.  There are also some almost microscopic seedlings which I suspect are the snapdragon or heartsease that I sprinkled in front of the sweet peas.  I am very excited at the prospect of growing some old-fashioned flowers.

2015-04-18 04These are some of the flowers on one of the hibiscus shrubs in the front garden.  It is in the part that is yet to be mulched.

2015-04-18 05It was 4.30pm and I had just finished photographing the garden handiwork when I noticed that this sunshower.  It is the regular rain and relatively warm climate that we enjoy which keeps everything lush and green.  Of course, the rich, volanic soil helps, too.

Permaculture Principles or Plain Commonsense

4 Comments

Whatever you want to call them, there are things we can do in the garden that will save money and resources.

Here are a couple of projects we have been working on this weekend.

2012-08-05 01When we came here there were numerous shrubs/small trees planted close to the front verandah.  They provided some screening and privacy from the road.  Over time we planted a screening hedge of native shrubs along the boundary so the ones closer to the house became less important from a privacy point of view.  We extended the area in front of the verandah and slightly reduced the amount of lawn.  The shrubs have been pruned several times to try to keep the blow the level of the gutter.

Last year I decided on the final format for this area.  We will have a selection of flowering hibiscus in front of the verandah.  We bought 5 hibiscus at the Garden Expo in July last year and they have been progressing well.  However, one of them was beginning to struggle and we realised that it was being shaded by one of the grevilleas.  We cut down the three remaining shrubs, mulched everything that was small enough to go through the mulcher and cut the bigger branches into manageable lengths.

2015-04-06 02While Gman was mulching Istarted laying out newspapers (usually about 6 sheets at a time) and hosing them down to stop them blowing away.  The we piled the mulch we had made at one end.

2015-04-06 03This shows a close-up of the small logs that we used to create the back edge of the area to be mulched.

2015-04-06 04Here is the mulch spread out.  It was convenient that we ran out of mulch and newspapers at about the same time.  We are going to bring home whatever newspapers we can collect from work in order to continue our project.   There is still quite a bit to do as you can see from the next photo.

2015-04-06 05You can also see some of the hibiscus.  They seem to really be enjoying the full sun now that the overhanging shrubs have been cut down.  We have been offered a huge pile of mulch from the neighbours so that will go towards completing the mulching of this area.  The next job will be to buy some more hibiscus.

2015-04-06 06Finally, I wanted to show you the garden bed that I started last weekend.  It is now dug over, edged with rocks and seeds planted.  We have no shortage of rocks as they are everywhere on the block in all shapes and sizes.  I have planted sweet pea, snapdragon and heartsease seeds in the hope of having a border of colourful spring flowers.  The sweet peas are in a furrow close to the fence which will do double duty of keeping unwanted animals out of the vegie garden and being a trellis for the sweet peas.

Flashback Friday

1 Comment

As with all new projects, ‘Flashback Friday’ is being fine-tuned.  As well as linking back to the original post I am going to copy and paste it into a new post.  So, here goes…..this is from August 2012 just before Izz turned 3.

I have been making a gift for Izz for her birthday.  She has a doll’s bed which has been passed down to her but no bedding.

I bought 2 u-shaped pillowcases recently from the op shop.  Here is one that I have unpicked ready to use.  Note the roll of fabric which is the dismantled and pressed frill.

2012-08-06 01The Duke bought a piece of foam cut to size for the mattress and I have covered that using some of the pillowcase fabric.

2012-08-06 02The next step was to make a patchwork quilt.  I worked out the size and number of pieces I would need.  The plain pink is more of the pillowcase, plain mauve from a piece in my stash of fabric, Dora pattern is a few leftover scraps from the doona cover and curtains that I made for Miss O last year and the pink patterned fabric is from a blouse I picked up at the op shop.  The frill is the one I unpicked from the pillowcase.  The hemmed edge remained intact so I simply regathered it and reapplied to the quilt edge.

2012-08-06 03I bought a large piece of cotton/bamboo batting for a bed quilt I am working on for Izz’s bed so I used a small piece for this quilt.  (I think this is a rather spoiled doll!)  The backing is more leftovers from some op shop fabric.  I quilted it by simply machine stitching along the seam lines which is nothing fancy but seems effective.

2012-08-06 04The finishing touch was to make a matching pillow.  A couple more fabric scraps and some salvaged filling from an old cushion and I had a complete set of bedding for the doll.  Here is the mattress with the pillow.

2012-08-06 05The total cost of things I bought specifically for this project was $6.60.  This is a gift which I know will be loved regardless of the cost.  I am looking forward to seeing Izz’s face when she opens the gift.

Now I need to work on the the bed quilt I am making as well since her birthday is in 2 weeks and I want to be able to give her the present before we go on holidays.

2015-04-03 01In the interests of presenting a complete picture here are a couple of photos I took when she received her parcel.

2015-04-03 02

Mad Hatter

2 Comments

Apologies for the lack of post yesterday but I was otherwise engaged so no opportunity for blogging.

I was in the office for most of the day today but late this afternoon I spent a couple of fun-filled hours creating these millinery masterpieces for Miss O and Izz to wear to the Easter concert and hat parade at school.  I had picked up a couple of packets of Easter decorations at Spotlight yesterday and we combined these with various things that Belle had in her box of craft bits and pieces plus a couple of sheets of coloured card.  Some glue and staples to assemble the hats and these are the results.

2015-03-31 01I apologise for the poor quality of the photos as I quickly snapped them this evening and I clearly have not mastered the camera function on my phone!

2015-03-31 02

Progress in The Patch

4 Comments

Our vegetable garden area  has been a work in progress for several years and continues to be so.  However, I feel as though we have taken a giant leap forward today.

We had a load of soil delivered yesterday.

2015-03-28 01This was the view of the area yesterday.

2015-03-28 02The three beds in the foreground have been established for some time and the top one currently has lettuce and bok choy and the bottom one has beans and bok choy while the middle one is empty after having cleared out the remnants of tomato and cucumber plants.  This bed needs topping up with additional soil.  In the background towards the chicken coop is a clump of sweet potato growing in a small cut-down rainwater tank.  Of course, it has overflowed and is growing across the ground towards the fence.

The lower two beds in the background have a small amount of leaf litter and mulch but are yet to be used.  At the top of the second row is the sixth raised bed partially built.  We still need to finish cutting the iron to size and attach the sides.

We started early today and moved the soil to fill the completed beds.  This is all that was left this afternoon when we had finished.

2015-03-28 03Then it was time to add the sides to the final bed.  Remember the sweet potato I pointed out in the earlier photo?  We dug it all up and harvested a bucketful of decent sized sweet potatoes.  There were lots of small ones but we have sacrificed them for the long-term plan.  I planted several pieces of vine that had significant root growth as well as numerous potatoes that were shooting.  These all went into the bottom bed.  The remainder of the soil from where the sweet potatoes were growing went into the base of the last bed.  We then salvaged several wheelbarrow loads of leaf mulch from behind the rainwater tank and finally added the garden soil.

2015-03-28 04Here are the 6 raised beds filled with soil and I have planted some cabbage, broccoli, cauliflower and kale seedlings that we bought last weekend.  There is still plenty of space so I am planning to plant some seeds as well.

The other thing I did today was to trim and tidy up the basil which has gone completely rampant.  I even found some new plants so I potted some and planted others in the garden bed.  I have tied the clumps of basil up to the fence to stop them spreading all over the ground.  The basil are in the foreground of the photo below.

2015-03-28 05Tomorrow, I am hoping to dig another garden bed along the fenceline as it heads towards the front of our property.  The plan is to plant flowers in that bed.  I have bought sweet pea seeds and intend to grow them using the fence as a trellis. but more about that another day.

Flashback Friday

Leave a comment

Here is a post from 3 years ago when I first tried my hand at making Tabasco sauce.  It was a great success and the quantity lasted for a couple of years.

Unfortunately, the chilli bush did not survive the changes to the vegie garden area so we bought another one in the middle of last year.

Today I am making more sauce and using just half of the quantity stated in the original recipe.  This has to be one of the simplest preserving recipes around.  I am looking forward to having a bottle on hand so that I can add a couple of drops to various dishes that I make.

2015-03-27 01

Tracking 2015 – February

Leave a comment

At the end of January I wrote a post about tracking our spending for the year.

It is now the end of February and we have continued our diligence in order to create an accurate picture of our variable spending.

BudgetingThere was no more holiday spending and our grand total for February was $1,620.92 which is almost exactly $1,000 less than the total for January (excluding bookings for our holiday).  Many, but not all categories were substantially less.  This was not because of any concerted effort, but rather, is an indication of how our costs fluctuate on a month by month basis.

Food made up a much smaller proportion with a spend of $233 in February compared to $633 in January.

Most importantly, if the food and transport costs for the first 2 months of 2015 were averaged out over a 12 month period they work out to slightly less than the figure I put in our budget estimation late last year for the financial planner.  This makes me feel as though I have a pretty good idea of where our money goes and how much it costs us to live.  The proof will come later in the year if the figures continue to stack up.

Upside Down Hook

2 Comments

As I have mentioned before, it can be the smallest things that can make a real difference to organising your home.Here is an example.

I keep the clothes hamper in the laundry cupboard and the small step-ladder fits beside the hamper.  The only problem was that every time I pulled the hamper out to sort the washing, I would have to hold the ladder and then re-position it to stop it falling over.  One day I thought of a solution so the next time we were at the hardware store I selected a large hook which is designed for hanging things in a garage or workshop.

I calculated where it needed to be positioned and The Duke attached it to the dividing wall in the cupboard.

2015-02-24 01You can see that the hook is upside-down compared to how it is designed to be used.  My idea was for it to retain the step-ladder so that it would not tip over when the clothes hamper was removed.

2015-02-24 02It works perfectly and does not impede getting either the ladder or hamper in or out of the cupboard.

This does not look like much but it has saved me an endless amount of frustration.  The key is to think laterally and look for solutions that may be a bit ‘out of the box’.

Do you have any unique organising tips to share?