Lovely Lasagne

Leave a comment

I think everyone has a personal favourite way of making lasagne.

Lasagne was my ‘go to’ dish in the early days of our marriage. In fact, so much so that GMan once commented that our impending dinner guests had eaten at our place previously so we would need to think of something else! 

My version of lasagne has evolved noticeably over almost 45 years due to a changing culinary landscape and a variety of dietary considerations. I have reduced the proportion of meat in the dish, eliminated cream, use gluten free flour and pasta. The latest iteration actually replaces the pasta with thin slices of zucchini and the bechamel sauce is made with cauliflower rather than a roux of flour and butter. Interested? Read on for the full details.

LASAGNE

Meat sauce

250g lean minced beef
1 cup dried red lentils
1 large onion, finely diced
2 cloves garlic, crushed
1 large carrot, grated
2 sticks celery, finely chopped
2 teaspoons beef stock powder
2 tins crushed tomatoes   } – whatever combination of fresh, dried or frozen tomatoes
2 tablespoons tomato paste }  you have on hand. More water may be required.
Herbs (fresh or dried) to taste – I used a handful of fresh basil and 1 teaspoons of
              dried mixed herbs
Salt and black pepper to taste

Method

Place the lentils in a bowl and cover with boiling water. Allow to stand for 30 minutes. In a large saucepan fry the onion and garlic, add the mince and brown. Add the remaining ingredients including the drained lentils. Simmer gently until the lentils are tender. Add more water if the mixture becomes too dry.

White Sauce

1/4 cauliflower
Milk
Salt – 1 teaspoon
Black pepper – 1/2 teaspoon
Vegetable stock powder – 1/2 teaspoon
Smoky paprika – 1/4 – 1/2 teaspoon
Nutritional yeast – 1 tablespoon

Chop the cauliflower roughly. The stalk and small leave can be included in this recipe. Steam or microwave until tender. Place cooked cauliflower in blender and gradually add milk until the mixture is smooth and a suitable consistency. Add seasonings to taste. The quantities are only suggestion so add a bit at a time until it reaches your desired taste. 

Set sauce aside until required. This sauce can be refrigerated for a couple of days or frozen if you have too much. It can be substituted in any recipe that requires a creamy white sauce. You can use plant-based milk if you choose.

Other

Zucchini, sliced thinly lengthwise
Grated cheese, I use a mixture of cheddar, parmesan and nutritional yeast

Assembly

Layer the various components in an ovenproof dish. I usually do meat sauce, zucchini, white sauce and then cheese and repeat 2-3 times until the dish is full.

Cook in the oven until heated through and browned on top. Alternatively, it can be heated in the microwave and finished off under the grill to brown the top.

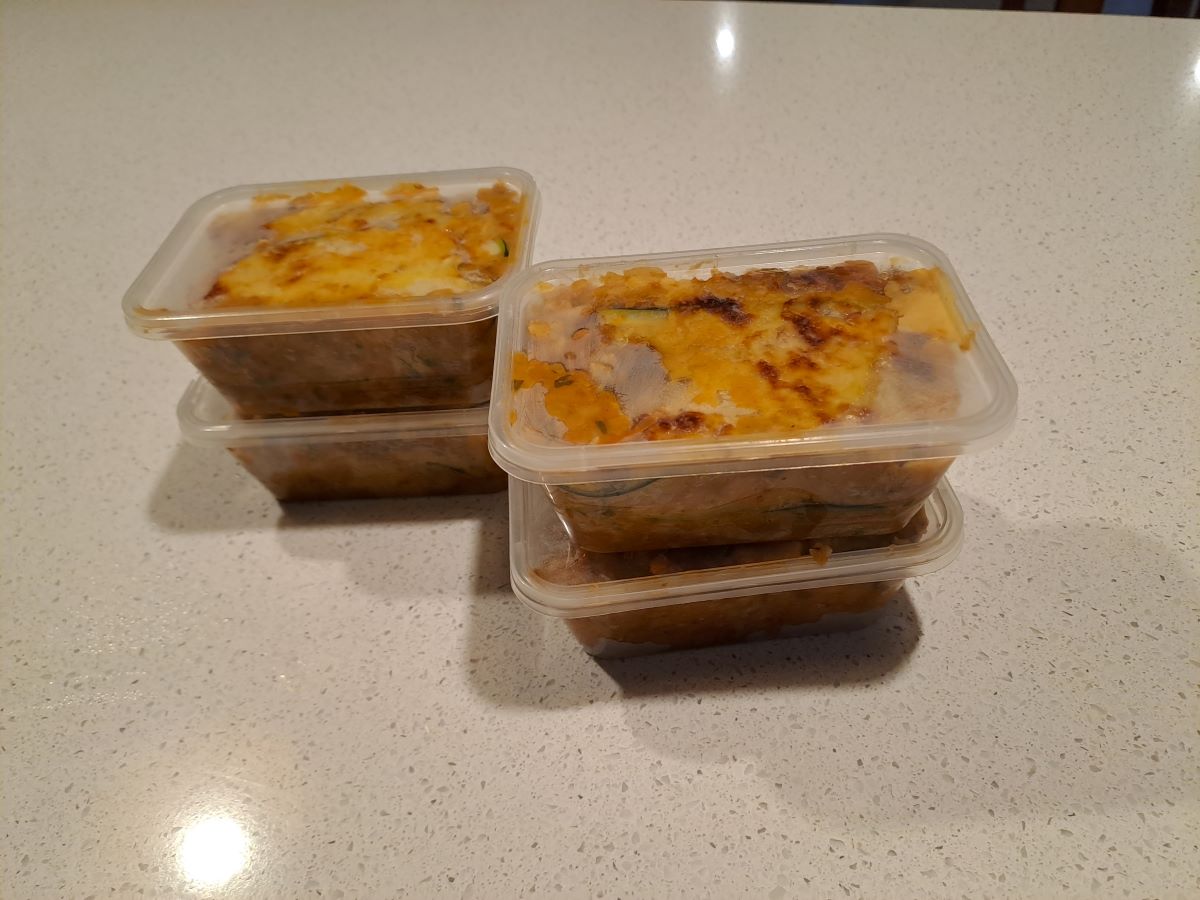
Makes 6 generous serves.

This is the only photo I have as I did not think of writing this post until after we had eaten dinner. We ate 2 serves and the remainder were packed up and frozen in 4 individual serves.

How to Make a ‘Safe Scarf’

Leave a comment

This is a follow-up to my post from yesterday.

Here is an overview of how I created the scarf. This is not a sewing blog and therefore it is not a step by step tutorial as such. Additionally, it assumes general sewing competence.

The dimensions are somewhat variable but you will need a piece of fabric that is approximately 150-170cm long and 25-30cm wide and an 18-20cm dress zip.

Insert the zip close to one end of the fabric.

Stitch the remainder of the long edges in a 1.5cm seam with right sides together.

Turn the tube to the right side. Press the seam flat so the the seam and zip are lying in the middle of the tube. Use the seam allowance to create a lap to conceal the zip.

Press under 1cm on the end away from the zip.

Insert the end near the zip inside (1.5-2cm), pin and carefully topstitch to secure the ends. Check that the stitching has caught on both sides.

Stitch across the scarf at the lower end of the zip to create the secure pouch. Trim loose threads.

Completed infinity scarf with secure pouch.

A Safe Scarf

2 Comments

I have a shoebox full of scarves in various weights and colours which I wear on a regular basis. However, yesterday I made myself a new one which is a bit bit different and rather special.

It is a infinity (loop) scarf made from some fabric scraps from my stash. The particular feature that prompted me to make this was the ability to create a discreet pocket for valuables. I had seen a similar item advertised a few years ago as being suitable for travellers and I had always considered making one. 

So, I finally did it. I used a lightweight crinkle cotton as our next trip is to Hawaii so a heavy fabric is definitely not required.

You can see the zip and pocket section more clearly in this close-up. The zip was also a salvaged one from my stash. I was fortunate to have one in an appropriate length and colour.

The zip opening and pocket are large enough to hold a passport. The ability to carry my passport and cash discreetly and on my person is an important consideration when in busy public spaces when travelling.

Here is an example of me wearing the scarf with my passport in the pocket section of the scarf.

A New Buy

Leave a comment

It is a relatively rare occurrence these days for me to buy much other than consumables such as groceries and fuel, and experiences including travel, tickets to shows and events.

However, I think a recent purchase is worth sharing. Just after Christmas I was ordering some mixing bowls for one of my daughters. While perusing the website I saw some Joseph & Joseph chopping boards. These are rather expensive but were significantly reduced. I had seen my sister using them when we stayed with them early last year and I was impressed with them but had not done anything more about looking for some.

Anyway, I bit the bullet and bought two new red (naturally) boards. They are what I would regard as large and extra large. They are plastic but that is offset by their perceived longevity.

I may be a bit late to the party but here are some of the features I love about them. There is lip around 3 sides and a slight slope overall. These help to retain juices or errant bits when preparing food. Juices can also easily be poured from the deep corner. This in turn, helps to minimise waste. The recessed handles make them easy and safe to carry. One side has a spiked area which can assist in holding meat or other items in place while chopping them. There is also a narrow rubber strip on the edges which means they are stable and do not move when being used.

I have tried and used a variety of chopping boards over the years but these really appear to be the closest I have found to perfectly meeting my needs.

The other collection of boards all have their uses and will remain part of the kitchen until they break or wear out.

Nothing New

2 Comments

In June 2014 I took my first tentative steps towards making a quilt using Disappearing 9 Patch blocks. I was finally completed nearly 7 years later as I finished sewing the binding on while I sat with my mother when she was in hospital. I am so glad that I was able to share the finished quilt with her as much of the fabric had come from her stash of offcuts from garments she had made for herself and various family members over many years. You can see it here.

Last year I offered to make one for our younger daughter. Her preferred colour palette was soft greens such as sage and olive. I wondered how on earth I was going to source sufficient scraps of these colours as they are not generally colours that I use. However, I have been remarkably surprised at the bits that have come my way from many and varied sources.

Initially, I made about 6 blocks but I have not made any since before we moved. I had been collecting and cutting fabric in preparation. So, the past couple of days have been a bit of a marathon and I now have 33 completed blocks. I have some squares cut out but need 42 blocks altogether so I need to keep a close eye on fabric in op shops.

This is a preliminary layout with the completed blocks.

I am confident that this quilt will not take 7 years to complete.

Monday Mending

Leave a comment

I chose to begin 2024 with a spot of mending.

A couple of weeks ago I noticed that the sheets on our bed were beginning to look a bit threadbare. I have 4 sets of QS sheets which I rotate for our bed and also the guest bed. Naturally the ones on the guest bed don’t get a lot of use. They are top quality pure cotton sheets and have lasted very well. In fact, I could not remember when I had last bought sheets. After doing some detective work I discovered that they would have been one of the sets referred to in this post from June 2011. Over 12 years is not bad.

However, I was not quite ready to throw them out. The top edge of the top sheet was literally disintegrating so I removed it and replaced it with a strip from a KS sheet which I bought recently from the local op shop. I used some of it for the backing of a quilt but there was plenty left for other projects.

Then I turned my attention to the bottom sheet. This had 2 small splits amid a larger very worn area. You can see the splits on the wrong side after I had placed a patch on the right side.

I use double-side fusible interfacing to secure the patch before sewing it. This also helps to reinforce the worn area. I used a piece of very similar fabric for the patch.

I know it probably doesn’t look particularly comfortable, I will be able to place the sheet so that the patch is near the foot of my side of the bed and my feet barely reach that spot.

I don’t know how much these repairs will extend the life of these sheets but it was a relatively easy fix and a worthwhile one in my opinion.

The other two jobs were alterations rather than mending. I had bought both of these tops at op shops recently and while they are in very good condition the sleeves were too long for me and the grey striped one was much too long in the body. I have adjusted them for a better fit and they are ready for wearing during the cooler months.

Christmas Crumble

Leave a comment

Fruit crumble is one of my favourite desserts but is not usually on the Christmas menu.

This year I am preparing lunch for 3 adults on what looks like being a cool and rainy day despite the fact that it is the middle of summer.

I have plenty of cooking apples and an abundance of frozen mulberries so we will be having apple and mulberry crumble with ice-cream for dessert on Christmas Day.

CRUMBLE TOPPING

Ingredients

1 cup coconut
1/2 cup sugar
1/2 cup plain flour (I use gluten-free flour)
1/2 cup flaxseed meal
2 teaspoons golden syrup
2 teaspoons powdered cinnamon
2 teaspoons powdered ginger
2 teaspoons powdered mixed spice
90g butter

Combine all of the dry ingredients in a large bowl. Add the syrup and mix through. Finely shave the butter and rub through the dry ingredients using your fingertips.

Spread the crumble mixture on top of your favourite stewed fruit and cook in oven or airfryer until the topping is lightly browned and crisp.

NOTES: This is a large quantity as I freeze any excess for future use so you may wish to halve the amounts. I only use real butter as it needs to be very firm (not spreadable) for this recipe.

A Combined Effort

2 Comments

I have recently finished making this lap quilt.

Let me explain the ‘combined effort’ in the title.

The embroidered calico blocks came to me in a bag of salvaged textiles that had been donated to an op shop but were destined for landfill as they were deemed not to be saleable. The blocks were sandwiched between other larger pieces and may not have even been seen. They had been hand embroidered and I felt it was important to respect the love and care which had gone into the handiwork.

So, I trimmed the blocks to a standard size and set about sourcing some plain coloured fabric which would complement the embroidery colours. Some were from my own stash and others from a friend.

The patchwork top was finished earlier in the year before we left Queensland. Once we moved I needed to find someone with a long arm quilting machine as I wanted to make sure that I did justice to the work so far. I bought a king-size sheet from an op shop for the backing and the binding and handed it over to be quilted. My quilting contact did a marvellous job of highlighting the various elements of the embroidery and patchwork.

Then it was my turn to add the finishing touches with the binding which was also cut from the sheet.

You can see the backing and quilting detail in the photo.

I feel like this was a really worthwhile project and the only new materials were the batting and thread.

In the Kitchen

Leave a comment

While our granddaughters were visiting us my kitchen activities were limited to just getting the next meal on the table but yesterday I managed to do a bit of forward planning and preparation.

The first thing was to make some Choc Fruit and Nut Balls. These are perfect for Christmas gatherings (or any other time of the year) when you are asked to contribute a plate. They are always well-received and are super-easy to make (no cooking required). They freeze really well and it is easy to pull some out at a moment’s notice.

My next job was to make some more peanut paste. I buy raw, unsalted peanuts and lightly dry roast them before putting them in the high-speed blender. I have previously roasted them on a baking tray in the oven but this time I decided to try them in the airfryer. This worked perfectly. I did 2 batches in a round cake tin for 10 minutes at 170C.

Meanwhile, I had a batch of grapefruit marmalade simmering on the stove. I never thought I would be making marmalade in December as citrus usually ripen here in late autumn/early winter and it is now officially summer. However, GMan took the car to have some work done on it the other day and was at a loose end for about 4 hours. So, he went walking in Bendigo while he waited and happened upon some free grapefruit in a box on the footpath. He collected 8 grapefruit in his backpack and they are now marmalade.

Also, in the spirit of not wasting anything I had these remnants to deal with. The last of the peanut paste is notoriously difficult to remove from the jug of the blender so I chose to leave about a tablespoonful of the mixture and then used that to make satay sauce. I set the excess coconut from rolling the choc fruit balls aside and then used it in making another batch of gluten-free muesli.

Here is our dinner of satay chicken with rice and green salad.

All of the recipes mentioned are elsewhere on the blog as they are regular favourites here. Here is the link to the recipe index which can be found on one of the tabs at the top of the front page of the blog. I refer to it frequently because a lot of what I write is as much for me as it is for my readers. Please feel free to use the index as your own.

The link for the Choc Fruit and Nut Balls is somewhat different to the ones I make now – there have been multiple modifications and I will add the updated version later today.

Creating and Crafty

Leave a comment

We have been away for a few days at the beach with our guests. The weather was not great – cool and rainy. Unfortunately, you cannot plan on good weather but we had a relaxing time and a change of scenery.

Yesterday evening I was inspired to create a Christmas table centrepiece using a hard plastic cone which had contained Ferrero Rocher chocolates. I did not buy them but it had been brought by a guest at a function we hosted a couple of weeks ago and it seemed too good to throw out. I filled it with a few baubles and Christmas decorations. Then I reattached the base with sticky tape and added some gold ribbon trim before placing it on a stand made from part of the insert which held the chocolates.

It has been hot today so I have stayed indoors and done some sewing. I made these bags from some fabric gifted from a friend.

Then I finished refashioning the sundress for Miss14. I cut a small amount from the hem to create straps to tie over the shoulders. These replace the rather flimsy adjustable shoestring straps that were on it originally. She is happy with the result.

A few other alterations for Miss16. I shortened a newish pair of cargo pants which were just a bit too long and dragging on the ground as well as turning a pair of older black leggings with holes in the lower leg into a functional pair of bike shorts. These are always in high demand in their household for wearing under netball uniforms.

Finally, I am working on some minor alterations to this dress. It is for Miss16 and we found it in an op shop while we were away. She is notoriously fussy and difficult to please but fell in love with this one. I have unpicked the side seams of the bodice to take it in slightly under the arms. I also intend to redo the hem so that it has an overall better finish. I think it was $7.50 well spent as she is planning to wear it to her semi-formal in the middle of next year.