Built for a Purpose

4 Comments

A very quick post tonight in between trying to catch on on some housework.

I brought the washing in this evening and folded it on the laundry bench.  Now, that may not sound very exciting but I was inspired to take a photo to show you.

2016-04-11 01

While the bench was not totally clear – a few things in one corner – it was adequate to fold a load of washing.  That was my plan when we had these cupboards built not long after we moved in.  The reality is somewhat different.  There always seems to be a bucket with something soaking in it, handwashing to be done and a myriad of other things.  I end up doing the folding on the spare bed or lounge and neither option is good for my back.

I am definitely going to try to keep this bench clear so that it can be used for folding clothes on a regular basis.

The Importance of Ironing

4 Comments

I know many of you will not read this post and others will shake their heads in disbelief at the title but please bear with me.

Ironing is an aspect of homemaking that seems to be almost universally hated but there is a valuable aspect to the task.  I have mentioned before about the importance of taking care of what you own to get the maximum use from it and thus reduce the overall carbon footprint of any item.  This applies to clothes and keeping your clothes in good repair makes good economic and environmental sense.

Taking the time to check each garment while you are ironing can identify problems before they become too extensive to repair.  My previous post about my black linen top highlights this point.  I noticed they fraying at the hem and have repaired this by using a wide satin stitch (zig zag) along the edge that had frayed.  I have checked the remainder of the hem edge and cannot see any signs of similar problems, however, I will keep a close eye on it in the future.

2016-04-10 01

The mend is not invisible but reasonably well-disguised so I am happy to continue to wear this top.

Today when I was ironing I discovered 2 other issues.  The first was one of GMan’s business shirts.  There was a small yellow stain on the back near the armhole and I have no idea of the origin.  It is about the size of a 20c piece and not terribly noticeable as it is a dark checked shirt.  However, I have soaked the shirt in the hope that the stain will come out.

The other discovery was another minor mending job.  I have a pair of white trousers with a centre back zip and a few stitches of the seam had broken just below the zip.  This is not a huge issue at the moment but could be if I wore them and split the seam further.  I repaired the seam and they are as good as new.  This is a classic example of the saying “A stitch in time saves nine”.  It could also save me from a potentially embarrassing and costly situation if I had to rush out and make an emergency purchase.

Obviously, I do not iron everything but hanging out washing or folding clothes I also take time to make sure they are in good order and ready to be worn.

Disappointed

Leave a comment

I was doing the ironing today and one of the items I ironed was a black linen top that I bought in Melbourne when we were on holidays in December.

2016-04-07 02

I noticed that there seemed to be a small segment of frayed fabric on the bottom edge.  On closer inspection I discovered that that bottom has a facing rather than a turned hem and the fabric had been trimmed too close to the stitching leaving next to no seam allowance.

2016-04-07 01

Thanks to my spreadsheet tracking what I wear, I know that I have worn it 4 times.  This is not a $5 top and I am really disappointed that this has happened.

I could toss it in the bag to go to the op shop but I have decided to take responsibility and mend it.

My first thought was to align the edges and zig zag it together using a fairly short stitch.  This would be far from invisible but fairly effective.  The section in question is on the bottom edge at the back of the garment.  Alternatively, I could unpick the topstitching to access the section from the inside and restitch it.  My concern with this approach is that it could create a noticeable dip in the edge.

How would you approach this mending task?


A Bumper Crop

2 Comments

It is just as well we like sweet potatoes.  Here is what we dug up on Sunday.  i Have not weighed them but there would have to be at least 20kg.

2016-04-05 01
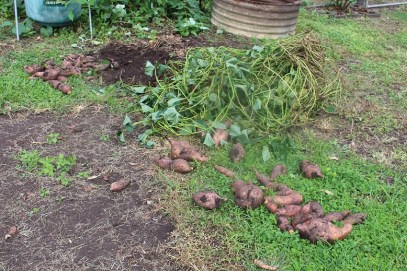
We dug these up from where they had become established in one of the cut down water tanks that we use for the compost.  The sweet potato vines were entwined with the raspberry canes so we decided it was time to pull them out and this was the result.

Sweet potato mash, fries, curry and soup – the options are endless.

I will definitely be trying this one, too.  Thanks, Julia.


Taking the Time

Leave a comment

Today we met the housesitters who will be taking care of our home while we are overseas later in the year.  We invited them to come and have a look around, meet the animals and generally get a feel for the place. We spent a few hours showing them around and explaining various aspects of the property.  During that time we had lunch on the verandah as it was a lovely day.

As we discussed various things it struck me how much of our home and garden is simply taken for granted or gets forgotten in the myriad of tasks which make up our day to day routine.  Time really appreciate what we have.

After our visitors had gone GMan and I spent a while out in the garden.  Apart from the mass of sweet potato plants in one of the raised vegetable gardens we also had some which had taken root in an old cut-down water tank which is one of our compost piles.  It was becoming entwined with the raspberry canes so we began to pull them out and realised that there were potatoes growing.  I started digging and this was the harvest.

2016-04-03 01

The next job was down by the bottom fence.  We planted a new tree which we had bought a couple of weeks ago.  It is a tropical birch and according to the label will be perfect for our climate, deciduous with colourful autumn foliage.  It is difficult to see but look closely.

2016-04-03 02

A little further along the fence is a callistemon which has come up self-sown.  It was almost choked with wed and entangled in the fence so with a bit of care it will hopefully become established.

2016-04-03 03

Speaking of autumn foliage, the liquidamber is showing the first signs of colour.  A few golden leaves are peeping through the green.

2016-04-03 04

This is a broader view of the same general area with the liquidamber tree to the left of the photo.  Being in a high rainfall area, everything grows easily and well but unfortunately, that includes weeds and unwanted trees and shrubs.  Most of the foliage to the right of the liquidamber is not particularly pleasant or useful so we have finally made a decision to have a substantial swathe of it lopped and mulched so that we can replant the area with more suitable plants.  Watch this space for before and after photos.  Hopefully it will happen before we leave on our trip.

2016-04-03 05

This is a view of some of the trunks and undergrowth of the area we plan to have cleared.

2016-04-03 06

Behind the 2 water tanks is a clear area where GMan planted some pawpaw seedlings  a few weeks ago.  These had been given to us and they seem to be doing quite well.  They are difficult to see but there are about eight plants through the centre of the photo.

2016-04-03 07

Finally, here is the front verge which is a selection of native shrubs which we started planting about 9 years ago and have extended a bit more since then.  A couple of weeks ago I noticed some unusual foliage higher than the rest of the shrubs and it turned out to be a tree which we had not planted and already reached a height of about 5 metres.  I am not sure what it was but am certain it was non-native and almost certainly an invasive weed so GMan cut it down last week with minimal damage to the surrounding shrubs.  It is a reminder that we need to keep a closer eye on what is growing here.

2016-04-03 08

As always, the garden is a work in progress and we have lots of plans.  I hope you have enjoyed checking out a little of our place.


Welcome to the Weekend

Leave a comment

It is Saturday morning here.  The sun is shining and have lots of plans for the weekend.

2016-04-02 01

These flowers bring a smile to my face.  They are on the side table in the front entry.  I brought them home yesterday evening and yes, they are a little past their prime but I am happy to have them for a few more days.

We have a fresh arrangement of flowers each week in the reception area of our corporate office and they are discarded on Friday evening unless someone takes them home.

I finished work late yesterday and was happy to re-home them for a few more days.

May your weekend be full of smiles.

An Easter Recipe

Leave a comment

Happy Easter!

The desktop computer will not be back in action until the middle of the week so I am struggling with and old laptop which is very slow and not responsive.  However, I am determined to persevere and bring you a recipe for gluten-free hot cross buns.

Here is the original recipe which I used for the first batch which I made on Tuesday. The only alteration I made was to add another teaspoon of psyllium husk instead of the teaspoon of xanthum gum.

The initial prototype was acceptable but I felt I could improve on the recipe a little.

The instructions said that the recipe made 8 buns so I followed this and they were much too large for my liking.  The buns also tended to spread on the tray rather than rise.  Additionally, we prefer more spice and fruit.  I made a note of this for my second attempt.

Here is my amended recipe with method and photos.  Do not be put off by the long list of ingredients.  I have divided the ingredients into separate sections accoring to the method.

GLUTEN-FREE HOT CROSS BUNS

Ingredients

1 cup sultanas
1 cup boiling water

7g dry yeast
1 teaspoon sugar
120ml warm water

24g psyllium husk
3 eggs
250ml hot water

3 cups gluten-free flour
2 teaspoons baking powder
1 teaspoons bicarb soda
1 & 1/2 teaspoons salt
75g sugar
2 teaspoons cinnamon
2 teaspoons mixed spice
Zest of 1 orange

2 tablespoons sugar
Juice of 1 orange

1 egg
1 tablespoon water

3 tablespoons gluten-free flour
Water

Method

Place sulatanas in a small bowl and cover with boiling water and allow to stand.

076

Combine yeast, sugar and warm water in a small bowl and set aside to activate.

077
In a another bowl combine the eggs and psyllium then add the add hot water and set aside to thicken.

078
Place a large bowl of hot water in the oven and turn oven to 100C.  Set timer for 5 minutes.  After 5 minutes turn the oven off and remove the bowl.  This means the oven will be perfect for the dough to rise.

Place the flour, baking powder, bicarb, salt, sugar, spices and orange zest in a bowl and combine.  Add the yeast mixture and egg mixture and mix thoroughly.  Finally, drain the excess water from the sultanas and stir them into the dough.  This step could be done by hand but I use my Kitchen Aid mixer.

079

Turn the dough onto a well-floured surface.  Although kneading is not required for gluten-free baking (no gluten to stretch) you can gently roll and fold the dough a few times before dividing it into suitable sized portions.  I weighed my balls of dough and chose to make them 75g each which yielded 17 buns.

Place balls of dough into muffin pans or on a tray and set the tray in the pre-warmed oven for 45 minutes.

083
While the dough is rising prepare the egg wash to brush the top of the buns by whisking the egg and water together.  Make the mixture for the crosses.  Blend together the flour and enough water to make a smooth paste which can be piped onto the buns.  Place the flour paste into a plastic bag and snip a tiny piece off one corner.

Remove dough from the oven and turn oven on to 200C to heat while you finish the buns.  Brush with egg wash.  Pipe crosses onto the buns.

Return buns to the oven set at 200C and cook for 20 – 25 minutes.

Place the sugar and orange juice in a saucepan and simmer gently until reduced and thickened.

When the buns are cooked remove from the oven and drizzle with the orange glaze.

085

Ready to eat.

002

I was very pleased with the result and the final word comes from my friend who said that it was just like the commercially produced fruit loaf.  This has inspired me to try baking this recipe as a loaf which could be sliced and toasted.

NOTE:  The other variation is the type of flour used.  The original rice uses tapioca and brown rice flour.  I use my own mixture which includes both of these as well as potato and quinoa flours.  You can choose a commercial gluten-free flour or you own combination as long as it totals 3 cups.


A Cleaning Plan – Or Not?

1 Comment

Some people work to a plan for cleaning.  It could be vacuuming on Monday, dusting on Tuesday and so on or a room at a time.  Perhaps a schedule of things to do on a weekly or monthly basis.

I do not follow any set routine but tend to do things as required or more importantly, when I have time.

Today was one of those completely unexpected cleaning moments.  I was hanging out washing and noticed that there was some debris in the peg bag which hangs on my laundry trolley.  So I tipped all of the pegs into a bucket of soapy water and washed them.  Then I emptied all of the dirt and a mud wasp nest out of the bag and washed it, too.

Here are the pegs spread out to dry on an old towel.

2016-03-20 01

You can see how much the fabric has faded even though the trolley and bag are always on the verandah out of the weather.  The buttons were red originally as can be seen from the back of the button.

2016-03-20 02

The bag replaced on the handle of the trolley and filled with pegs.

2016-03-20 03

Some of the cane on the handle of the basket is broken and I am trying to decide how best to mend that.  I will write a blog post about that when I get around to doing it.

Clean and Uncluttered

Leave a comment

Last weekend I was doing some general housework and I cleaned and polished this small table.

2016-03-16 01

The furniture polish I use is a quantity of the cheapest vegetable oil I can find with a few drops of essential oil to create a pleasant odour.  I use either lemon or lavender oil.  I put a small amount of this mixture on a soft cloth (old t-shirts are good) and apply to the timber then rub it in and buff.

I washed and ironed the doilies and then replaced the ornaments.

2016-03-16 02

I love this table which I have had for about 20 years and all of the ornaments are special to me.

I keep most things fairly simple but do not subscribe to the minimalist style of an almost bare room.

I prefer the mantra of, “Keep only those things which you use or love”.  These are things that I love.

Dinner – Risotto

Leave a comment

Tonight I want to share another dinner idea with you – risotto.

In no way could this be described as a recipe but more of a method.

Risotto is arborio rice cooked gently in a small amount of liquid.  Keep adding liquid and stirring regularly unto the desired tenderness of the rice is reached.

I use my large flat-bottomed wok to make risotto.

Quantities for 2 adults (sometime there is enough left for 1 lunch).

1/2 onion, finely diced
1 teaspoon stock powder
3/4 cup arborio rice
Water

This will make the basic mixture to which you can add whatever you like.  I used asparagus and sun-dried tomatoes.

Fry the onion in a little oil.  Add the rice and toss to coat thoroughly.  Add some water and the stock powder.  Simmer and stir until the water is almost absorbed and add a little more water.  Continue to do this until the rice is cooked and almost creamy.

I also added 2 teaspoons of powdered dried tomato with the water.  Finally, I stirred through some sun-dried tomatoes and fresh asparagus cut into pieces and cooked for 1 minute in the microwave.

Serve immediately with a little grated cheese if desired.

2016-03-14 01

Pumpkin and bacon, broccolini and capsicum (peppers) or sweet potato and caramelised onion are some other winning combinations.  You can experiment with different flavours but I would advise only using 2 or at the very most 3 ingredients or otherwise the flavours become overwhelmed.  The only thing I do not use in risotto is mushrooms – they turn the mix a fairly unappealing shade of grey!