Bug-Free Brassicas

4 Comments

I have occasionally managed to grow cabbages, broccoli and to a lesser extent, cauliflower but it is a constant battle to keep them bug-free.  I choose not to use pesticides, therefore, exclusion remains the best option.

2020-05-21 01

After much research, I finally bit the bullet a couple of days ago and ordered a quantity of Vege Net from eBay.  I was particularly pleased to discover that the seller was located in my home state.

The order was dispatched promptly and I received it within 2 days of placing my order.

Then it was time to wrestle with 120 sq metres of knitted polyethylene fabric.

My plan was to make a reasonably fitted cover to slip over the hoops we had positioned over the garden bed.

I cut a large rectangle which would cover the majority of the bed and 2 semicircular pieces for the ends.  Pins are useless on this type of fabric so I used some old pegs to hold the pieces in place while I stitched the seams using a regular sewing machine.

2020-05-21 04

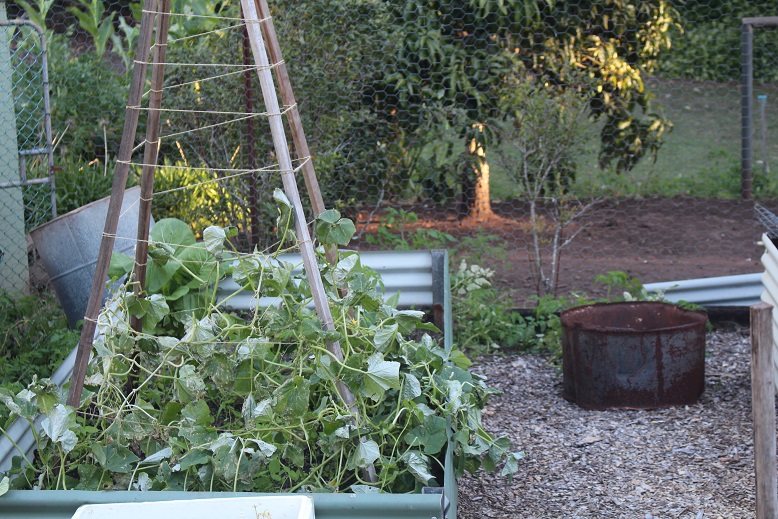
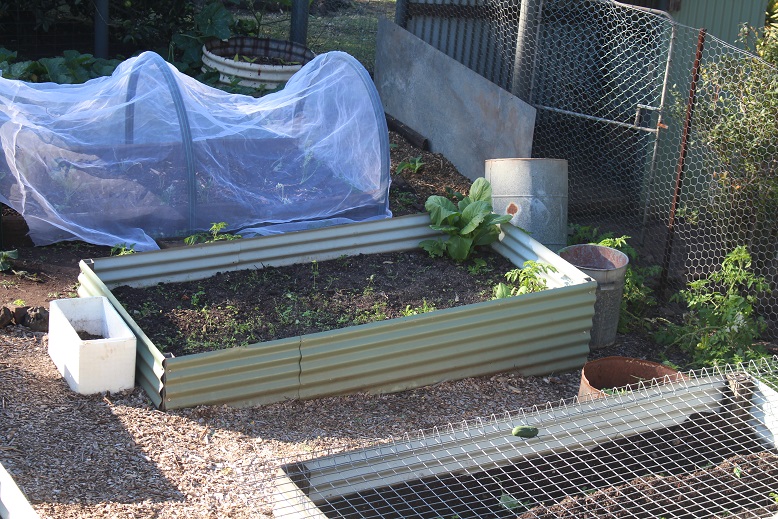
Once this was done, it was simple matter of slipping the cover over the hoops.  Because this is a raised garden bed the extra fabric simply hangs down to completely enclose the desired area.

2020-05-21 05

View of the new seedlings safely undercover.

2020-05-21 06

I anchored one end with some rocks so that it will not blow off.

2020-05-21 07

I am considering adding some lead weights to the other edges or making a long elasticised tie to go right around the raised bed.

There is another cover to be made for a second garden bed which is not raised so I will just anchor that one with rocks all the way around.

The total amount of fabric I used to cover the 2 beds was about 24 sq metres or 20% of the total.  The remainder is back in the bag for use to cover fruit trees or other garden beds in the future.

2020-05-21 08

I spent $125 on the fabric (including postage) and believe that it has been money well-spent as it is an investment in our future food production.

I would definitely recommend this product if you are considering exclusion netting for any plants.  It is available in smaller quantities and you could also simply drape it over the area rather than making fitted covers.

Isolationism or Self-Reliance

4 Comments

I have seen the following text and similar being shared in various posts on Facebook over a number of weeks.

Two can play that game China
Threaten our economy
All products from China will be left on the shelf !
Who’s With Me

However, there never seems to be any commentary from the person sharing the post as to how they actually propose to achieve this goal of not buying products that are made in China.

I believe that wherever possible we should be buying food produced in Australia.  Fresh and unprocessed food are generally the best nutritional option.  Additionally, packaged food may be produced in Australia but presented in packaging from China or elsewhere.  It is highly unlikely that you would be able identify where the packaging was sourced.

Food is not the only thing that most of us buy.  There are clothes, shoes, homewares and hardware supplies.  When was the last time that you checked where your purchase was manufactured?  Does it matter?

In my opinion, it is more important to be a conscious consumer generally rather than targeting goods from one particular country.  Buy only what you need (not want), understand what is ‘enough’, care for and repair what you have and source pre-loved items where possible as ways of stepping away from over-consumption.

2019-11-17 01

2020-03-28 01

2020-02-18 01

2019-02-02 03

Over-consumption means that we are drowning in ‘stuff’ that is cheaply mass-produced in countries such as, but not exclusively, China.  Become a conscious consumer and you will immediately significantly reduce the products you are buying from China.

Your thoughts?

Not Only Food

2 Comments

The past couple of days have focused on food recipes but those are not the only recipes on the blog.

You may have seen a recent episode of ‘Gardening Australia’ which featured a recipe for making an exfoliating hand scrub/balm with lemon and rosemary.  I have lemons growing and access to a source of rosemary from a friend so it was too good an opportunity to pass up.

Here are the details in case you missed them.

Lemon and Rosemary Hand Scrub

1 cup sugar
2 tablespoons olive oil
2 tablespoons lemon juice
Rind of 1 lemon
Sprigs of rosemary

The ingredients and utensils assembled.

2020-05-17 01

Finely chop the rosemary and lemon zest.

2020-05-17 02

Add the chopped ingredients to the sugar and combine.

2020-05-17 03

Add lemon juice and oil.  Mix thoroughly.

2020-05-17 04

Transfer to a sealed container and store in the refrigerator.

2020-05-17 05

This could make a great gift for a keen gardener.

This recipe is indexed on the tab ‘Recipes – Other’ along with other non-food recipes.

Refreshed and Updated

Leave a comment

It is now over 9 years since I began this blog.  There have been some hiccups along the way which included losing photos from the early blog posts.  Some have been restored and others have not.

After some time, I decided that an index was required as the recipes could be difficult to locate.  I created this but it was incomplete and certainly not up-to-date.  I have worked to rectify that but it will be an ongoing project.  The index contains hyperlinks to the posts containing recipes.  You will find the index under the tab labelled ‘Recipes – Food’ at the top of the blog.

2019-05-05 01

In an effort to make it easier for users to peruse the index, I have created various categories and listed the recipes in alphabetical order.

2018-08-09 02

There are over 70 recipes currently listed and include some which have been handed down through several generations as well as more recent acquisitions from friends and the internet and some of my own creations.  Many of the recipes are gluten-free or are able to be adapted to gluten-free as I began to eat a gluten-free diet early in 2012.

2020-01-13 06

In addition to the recipes I have also updated the blogroll on the right-hand side of the blog.  These are a selection of blogs that I find interesting and which have some similar themes to my own.  Blogs come and go so I have removed several which are no longer relevant or active and added others which have captured my interest more recently.  Please feel free to drop by and check them out.


Sweet Chilli Sauce

Leave a comment

As promised, here is the recipe for the sweet chilli sauce.

A couple of weeks ago my sister gave me these chillies.  They are milder than our birdseye chillies and she assured me that they are just perfect for making sweet chilli sauce.

2020-05-09 01

As always, I consulted Google for a recipe and found this one.  It is from the Australian Women’s Weekly and it was refreshing to find an Australian recipe that I did not have to interpret or substitute either ingredients or measurements.

I had enough ingredients for a half quantity so this is what I used.

Sweet Chilli Sauce

125 gram fresh long red chillies
375ml white vinegar
250ml water
1 cup raw sugar
1 teaspoon salt
3 cloves garlic, crushed

Remove green stems from chillies, chop chillies coarsely with their seeds. Process chilli until finely chopped.

Combine vinegar, water, sugar and salt in large saucepan. Stir over low heat, without boiling, until sugar dissolves. Add chilli, boil, uncovered, 20 minutes.
Add garlic; boil, uncovered, about 20 minutes or until mixture is reduced to 3 cups (375ml). The sauce will thicken on cooling. Stand sauce 10 minutes.
Pour hot sauce into hot sterilised bottles, seal immediately. Cool, refrigerate.
NOTE:
I probably boiled mine a bit too long.  I think the cooking times need to be reduced for the reduced quantity.  It looked and tasted wonderful when I poured it into the bottle but the seeds and skin were too hard and chewy.
I left it for about a week while I considered my options.
Yesterday I removed it from the bottle and added about another 125ml of water.  This all went into my high-speed blender which effectively blitzed the skin and seeds.  I then simmered it for about 5 minutes before re-bottling it.
2020-05-15 02
We had Zucchini and Corn Fritters last night and the sweet chilli sauce was the perfect accompaniment.  It is rather more opaque and smooth than the commercial varieties but the taste is second to none.
2020-05-14 03

Simply Delicious

4 Comments

Tonight I made zucchini and corn fritters for our dinner.  I checked out several recipes via Google and this is what I came up with.

Zucchini and Corn Fritters

350g potato (cooked and mashed)
1 and 1/2 zucchini (grated)
1 cup frozen corn kernels
1/3 cup chickpea (besan) flour
1 clove garlic (crushed)
Fresh rosemary and coriander (finely chopped)
1/4 teaspoon cumin
Black pepper and herb salt

2020-05-14 01

Combine all of the ingredients in a bowl.  Add spoonfuls to a hot frying pan with a little oil (I used coconut oil).  Cook on both sides until browned.  Remove to a warmed plate to serve.

2020-05-14 02

The quantity made 8 fritters.  We had 3 each for dinner served with beans from the garden and some homemade sweet chilli sauce.

2020-05-14 03

I will post the recipe for the sweet chilli sauce tomorrow.

Site Preparation

Leave a comment

In my last post I mentioned that we had ordered a garden shed. We have been debating the need for a shed for a number of years and have finally bitten the bullet.

It will be a very simple 3m X 3m structure with double opening doors at the front. There are no windows, no side door and no power. It is really no more than an oversized lawn locker to store the mowers, mulcher, brushcutter and possibly wheelbarrow as well as some storage shelving for accessories and fuel.

This will create some real workspace in the area known as the workshop.

It will probably be 3-4 weeks before the shed is ready to be installed but there was a bit of site preparation to be done beforehand.

This is a view of the area where the shed is to be placed.  There is no ‘before’ photo but it had become somewhat overgrown so we cut back shrubs and some heliconias as well as moving some logs which had been dumped there.

The impending construction is certainly motivation to clear up the area surrounding the new shed.

We have quite a large stand of heliconias so we removed a few that were encroaching on the access to the would-be shed as well as using the opportunity to clean out some of the spent ones.  The edge of the clump is clearly visible on the left-hand side of the photo.

2020-05-13 01

The shed will be in the centre foreground of the photo.

Looking slightly to the right you can see the area where we have almost finished moving what was a huge pile of mulch.  We will be planting several shrubs once the mulch is cleared.

2020-05-13 02

The shed site is not the only one we are preparing.  Yesterday we moved all of the furniture from our verandah which extends around 2 sides of the house in preparation for the floor to be sanded and recoated.  The sanding was supposed to happen today but it rained overnight and some of the flooring was wet so the start has been delayed.

This is the long side at the front of the house.

2020-05-13 03

The shorter end which looks out towards the vegetable garden.

2020-05-13 04

In other garden news, GMan planted clivias along the western edge of the driveway.  These were sourced from multiple plants we had in pots.  Most are orange but there are also some yellow ones.  My $20 investment in a single orange clivia which I bout almost 20 years ago has paid handsome dividends.  The yellow ones have also multiplied from a single plant which was a gift several years ago.

2020-05-13 05

I think the clivia plants will make a nice border to the edge of the driveway.  The area behind them is a work in progress.  The shrubs were planted in mid-December and are growing quite well.  You can see some of the piles of mulch which have been moved from the site near the shed.  We plan to lay some sheets of cardboard to suppress the weeds then cover them with the mulch.

Gifts From the Garden

Leave a comment

When you have a productive garden, there is frequently more available than you can reasonably use.  So, we are often giving away produce to family and friends.

It is not all a one-way street and we are grateful for goodies which are gifted to us in return.

My sister and brother-in-law recently gave us a large pumpkin and some chillies.  The pumpkin was put to good use and you can read about it in this earlier post.  I used the chillies to make a bottle of sweet chilli sauce.

2020-05-09 01

A few days ago we visited my brother at his newly-purchased inner suburban unit.  I hardly expected that we would come away with fresh produce when he had been there for barely 3 weeks.  However, I was surprised to find myself returning home with a container of macadamia nuts which we had collected from the back lawn of the unit block.  This bounty is falling from a tree overhanging from a neighbouring garden.

2020-05-09 02

Also, some friends gave us a quantity of rosemary.  We have planted some cuttings so that we can add this to our own garden and I stripped the leaves off the remainder and dried it in the dehydrator.  Once it was dried, I ground it and then mixed the ground rosemary with Himalayan salt and I now have a jar of rosemary salt which will be be perfect for seasoning.  I am looking forward to trying it on some oven-baked potato chips.

2020-05-09 03

I was watching Gardening Australia last night and saw a segment about making your own Lemon and Rosemary Hand Scrub.  I am going to get some more rosemary from my friend and try that one out.  The recipe and details will be a future blog post.


Cooking Day

1 Comment

Today I cooked.  I was inspired by the large pumpkin I was given yesterday as well as the chickpeas I had cooked yesterday.

The first job was to pack up the baked beans I had cooked overnight in the slow-cooker.  I had some for breakfast as well as these 3 jars to go in the freezer and half a jar which are in the refrigerator to be used in the next few days.

2020-05-04 01

I then cut up the pumpkin.  The 2 trays of sliced pumpkin have been basted with a mixture of olive oil and balsamic syrup.  These will be used on pizzas. Some of the larger pieces will be cut up and added to the chickpea and vegetable curry while the remainder will be become pumpkin soup.  I pre-roast the pumpkin as it is easier than peeling it and I find that it also enhances the flavour.

2020-05-04 02

Meanwhile I moved onto the curry.  As well as the chickpeas and pumpkin this also had stalks of choy sum and half an eggplant diced.  I ended up with a total of 8 serves (4 meals for GMan and me).

2020-05-04 03

I had other plans for the choy sum leaves and the other half of the eggplant.  Using this recipe for Eggplant Lasagne Rolls as inspiration, I made a dish of lasagne using the finely shredded choy sum leaves mixed with half a tub of ricotta that I had in the refrigerator layered with the sliced eggplant and a rich, herbed tomato sauce.  This is ready to be baked for dinner tomorrow night.  I will add a mixture of flaxseed meal and parmesan cheese to the top when it is almost cooked.

2020-05-04 04

One pizza was for our lunch today which we enjoyed.  The other one is ready for the cheese to be added, cooked and eaten another day.

2020-05-04 05

All of these dishes were made using a combination of ingredients I had on hand in the pantry and refrigerator with produce I had been gifted and what was growing in the garden.  One of the most important aspects is to ensure that nothing goes to waste.

Finally, I made some more spreadable butter blend.

2020-05-04 06

Although the title of this blog post is ‘Cooking Day’, it occurred to me when you have access to fresh produce from the garden (either your own or kind friends) there is always something to do.

More about my other food adventures another day.

Winter Beds

2 Comments

Although we live in a temperate sub-tropical zone, there are still distinct seasonal variations and we respond accordingly.

Two nights ago we experienced our first cold (for us) night when the temperature dropped to 6C (43F).

The prospect of this temperature was enough to convince me that the very lightweight summer doona would not be sufficient.  I retrieved the feather doona from the wardrobe in the spare room.  For me, it is not only about the physical warmth of the feather doona but the colours I use which reflect the cooler weather.

During the summer the bed is made up using light blue and white bed linen and I love the fresh, cool effect that this brings.

2020-05-03 01
Although the fabric is no heavier, the darker coloured linen makes the room feel cosier as the weather cools.  I changed the bed yesterday and substituted the winter bedding.

2020-05-03 02

My bed was not the only one that noticed the effects of the cold night.

The cucumbers were planted late in the summer but we had been fortunate to have a great harvest.  However, overnight the vine went from being lush and green to looking quite shrivelled in parts.  It does not like the cold nor the accompanying strong westerly winds.

2020-05-03 03

With the prospect of several subsequent cold nights, I decided to remove all of the mature cucumbers and clear out the vine.

The haul was surprisingly large.

2020-05-03 04

The vine and trellis are now removed so it is time to clear the weeds and prepare the bed for a cool season crop.

2020-05-03 05

What heralds the change of seasons at your place?