A Three-Pronged Approach

2 Comments

Although the blog posts have not necessarily reflected it, we have slowly but surely been concurrently working on several projects around the house.  It is interesting to note that they all relate to the approaches and entrances to our home.

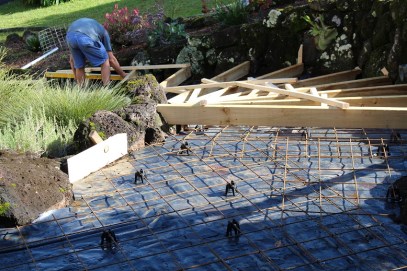
First is the walkway we are building which you can read about in this post.  The walkway will provide a more defined entrance to what is essentially our backyard.  It is close to the vegetable garden and the back steps that lead to the area of the verandah which we most often use for entertaining.  We recently took the next step and bought the timber for the horizontal rails.  I have painted them this weekend.

2018-06-17 01

This was not the only painting I did.  While I had the tin of ‘Woodland Grey’ paint open, I started on painting near the main entrance to the front verandah.

Yesterday I did the first coat of the wall.

2018-06-17 02

Today I made a start on the steps.  You can still see some of the original salmon colour in the section of blockwork under the verandah which is visible between the stair treads.

2018-06-17 03

Apart from the fact that I had the paint tin open, the real reason I painted this areas this weekend is that I wanted them done before the finishing touches are put to the concrete stairs.

This is the before photo which I took when we had pulled up some of the pavers.  You can see that the timber sleepers were beginning to rot.  It was a trip hazard and had no handrail which makes things difficult when we have elderly or less able guests.

2018-05-30 01

The builders weaving their magic.

2018-06-17 04

The end result.

2018-06-17 05

The concrete has to cure completely before the final step which is to have a non-slip finish applied.  This will be a similar colour to the surrounding rocks and will hopefully blend in to the surroundings much more than the fresh, grey concrete.

I decided to paint the adjacent wall as it is much easier to do before the final surface is applied.  There will be a short railing on the left hand side of the 2 steps up to the verandah so it made sense to do the steps before that is installed, too.

We are gradually painting all of the besser block base at the western end of the house and the next section to be done will be the walls surrounding the garage doors.  I will be glad to see the end of the salmon pink colour.

2018-06-17 06.JPG

I have not been the only one painting.  For the past couple of weeks GMan has been working on the door which leads from the verandah into the dining room.

2018-06-17 07

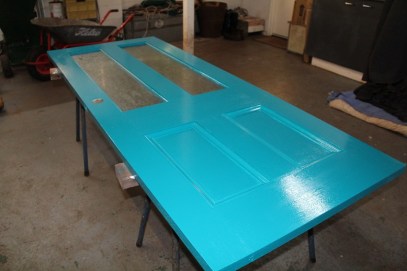
It has been bare timber since it was installed about 9 years ago, mainly because we could not decide whether to stain or paint it and if so, what colour?  The exterior of the house is very neutral and this will provide a real pop of colour as well echoing some of the tones in the lounge/dining room.  I will post some photos once the door is re-hung.  GMan has been busy sanding and painting the door frame as well as the doorstep.

There will be more updates as well as photos as these projects progress further.

Stocking Up

3 Comments

Even though there are only two adults in our household, I find it worthwhile to prepare bulk amounts of various meals and ingredients for meals.

Some of the bulk preparation is due to the quantities of seasonal produce from our garden and in other instances it is simply due to the recipe or my choice to make a substantial quantity in one go.

Here are some examples of the sorts of things I do.

Single lunch serves of pumpkin soup.  This was after we had soup for dinner, it was all from one medium pumpkin picked from the garden.

2018-06-16 01

Limes cut into wedges.  Citrus are in abundance at our place at the moment and this is just one of the many ways I am using the bumper crop of limes.

2018-06-16 02

Bagged and ready to pop into the freezer for a refreshing addition to chilled water – still or sparkling (from the Soda Stream).

2018-06-16 03

A bulk quantity of refried beans done in the slow cooker.  This recipe (from Mimi all those years ago) practically makes itself.  A versatile staple that I store in the freezer.

2018-06-16 04

Spiced peanuts – I used some in the kale salad tonight and the rest will be used for future salads, that is, if GMan doesn’t snack on them all in the meantime.

2018-06-16 05

A batch of gluten free cheese scones.  These are delicious with a bowl of soup on a cool evening so I always have some in the freezer.

2018-06-16 06

What is in your stock to make preparing meals easier?


Two Becomes One

Leave a comment

As promised, this post is about making do and mending what you already have.

4 years ago GMan and I capitulated and both bought an iPhone.  I refused to pay $75 for an Apple branded case but felt that a case would definitely be a wise idea to protect our expensive investments.  We managed to pick up ones for about $20 each which are both a bit the worse for wear now.

A few weeks ago GMan ended up buying a new phone (not an iPhone) as his had clearly reached the end of its useful life.  I decided to purloin the old case so that I could use the good bits of both cases to re-create a decent case for my phone which seems to be going along without any problems.

This is what I started with.

2018-06-10 01

The pink case is mine and the plastic phone cover had broken and become detached from the case.  The black case belonged to GMan’s phone and although the clip had broken off the case, the plastic cover was still in good condition.

2018-06-10 02

So I removed the phone cover and re-glued into my case.

2018-06-10 03

The edging had also lifted from my case so I redid it with some duct tape.

2018-06-10 04

The end result is not particularly pretty and I have my doubts of the wisdom of the duct tape.  However, I have gained an insight into how simple it would be to make a new case from scratch and re-use the black phone cover.

Meanwhile, my next assignment is to make a pouch for GMan’s new phone.  I hope to get that done next weekend.


Insourcing

3 Comments

Insourcing is a term that my friend Mimi from ‘A Tray of Bliss’ uses.  I don’t know whether it is an original term but it is basically the opposite of what so many businesses and households do – outsourcing.  So, insourcing is pretty much an alternative term for DIY.

It probably sums up a lot of what we do routinely – everything from growing food, gardening, sewing and even cooking meals.  However, I am nowhere near as diligent as Mimi when it comes to calculating the potential savings of learning and using skills instead of handing relatively simple tasks over to someone else.

However, the calculating was handed to me on a plate today when we received an email with a quote for replacing the outdoor steps and installing a handrail.  Upon reading it we saw the amount which had been allocated to removing and dumping the old pavers and timber sleepers.  This included the hire of 2 rubbish skips.

“We can do that!” These 4 simple words saved us almost $2,000.  Additionally, none of this will end up in landfill, we will have a pile of pavers that we can use for other projects as well as old hardwood sleepers that will provide firewood for next winter.

2018-05-30 01

I know that pulling up pavers is not for everyone but it is definitely worth looking around and seeing if there are things that you could do and create for yourself rather than parting with your hard-earned cash for what may even be an inferior product.

2018-05-30 02

We made a start this afternoon and will finish it on the weekend before the real work begins in earnest next week.

I can’t wait until this job is completed as it will provide a much improved entrance to our home.  The new steps will be concrete with a non-slip finish coloured to blend in with the surrounding rock walls and there will be no issues with pavers subsiding and causing a trip hazard.  The handrail will provide safer access, too.

Preparing for the New Arrival

Leave a comment

A couple of weeks ago we finally decided to buy a new freezer.  We have a reasonable amount of space in our fridge/freezer in the kitchen as well as a bar-sized freezer in the workshop downstairs.  I manage for most of the year but when we have a glut of produce that I want to freeze it becomes a real challenge.  As we work on growing more food I expect the pressure to become even greater.

We decided on the best location for the freezer which led to a major clean-up and re-organisation of the workshop area.

Here are a few ‘before’ photos.

2018-05-28 01

The best location for the new freezer was where the white cupboard is standing.

2018-05-28 02

The existing freezer was on the other side of the room, along with piles of cardboard that we use as weedmat in the garden.

2018-05-28 03

Another view.

2018-05-28 04

A corner of the double garage which is next to the workshop.

You can see some of the changes in the following photos.

2018-05-28 05

The no longer required carseat has been re-homed and this corner was perfect for the white cupboard which contains all of our camping gear.

2018-05-28 06

The cardboard is neatly contained in and behind the box under the end of the bench.

2018-05-28 07

The black cupboard has been given away as it was now excess to our requirements.  If you have less stuff, you need less storage.  We re-arranged various shelves and the metal toolbox for more effective use of the space.

2018-05-28 08

And finally, the new freezer in place.

I will show you more about the freezer tomorrow.

Introducing Maggie

2 Comments

I began to write this post 2 weeks ago but set it aside until now.

The number of blog posts lately is inversely proportional to amount of things that have been going on around here.  I hope to update you on a few of them this week.

In the meantime, back to the delayed post.

This is Maggie the mannequin.

2018-05-27 02

Although I have been making clothes for myself for most of my life, I have never owned a dressmaking model.  After years of vacillating I finally purchased this one with some of my birthday money.

Here she is unpacked, assembled and firmly ensconced in my sewing room.  I have begun making the size adjustments but have a bit more fine tuning to do.

2018-05-27 01

I am looking forward to doing some more dressmaking for myself in the not too distant future and am confident that Maggie will be a useful adjunct when it comes to getting best fit possible.

The Pantry Project – Part 2

Leave a comment

This is a follow-up post about my reorganising of the pantry.  You can read the initial post here.

Once again, there are no before photos which may be just as well because it was not a pretty sight.  My pantry has been been well-organised on previous occasions, however, a few things had conspired and it had spiralled out of control.

This version is a complete departure from my previous methods.  I have decided to group the jars by the type of contents rather than by size.  This means that all of the dried fruit is together, then several types of sugar, various flours and so on.  I will be interested to see how this works out.

Here are a selection of views of the shelves.  Not everything has been placed as yet and I still need to update the labels on some containers.

The top shelf has roasting pans, the dehydrator and pizza maker.

The next 2 shelves are primarily devoted to all of the ingredients which I buy without packaging and store in a selection of containers.

The lower shelf is the grocery items that I buy plus any home-made jam, chutney and sauce.  The breadmaker and food processor are also stored here.  Note:  The food processor was in use when the photos were taken.

The stockpot and tub containing the attachments for the food processor stand on the floor.  The paper bag on the far left is where I keep unrefrigerated vegetables such as sweet potatoes and garlic.

You may have noticed the 2 wire baskets under the shelves.  These are screwed to the underside of the shelves and roll out.  They are some of my favourite features of the pantry and I use them to store small containers.

The upper drawer is for spices and a substantial part of this organising was devoted to the spice drawer.  I have gradually been collecting an assortment of glass Vegemite jars  for storing the spices which I buy from a bulk store.  The jars are about 4 different sizes so I have chosen to utilise them according to the amount of each spice that I generally keep on hand.  They are now labelled on both the jar and the lid for easy identification.  There are still a few more to add.

2018-05-22 05

The other drawer has yet to be sorted out.

2018-05-22 06

One of the results of this job has been to locate various items that needed to be used up and identifying a few things that I will never buy again.  I try to avoid recipes/meals that incorporate huge numbers of ingredients that are outside of my regular selection and stick to basic ingredients that can be used in many different ways.


The Pantry Project

Leave a comment

It is hard to believe that it is almost 3 months since I wrote this post about my new labeller.  Although that post was about labelling the small drawers in my sewing room, if I am really honest, my main motivation was so that I could re-organise my pantry and label everything.

Unfortunately, the labeller has languished in the cupboard while the state of the pantry went steadily downhill.  Until yesterday.  The thing that finally prompted me was the arrival of some more Mason jars that I had ordered online.  They would not fit in the cupboard as it stood so this required some major re-thinking.

I am really very fortunate to have plenty of storage space so it was simply a matter of utilising it better.  I have a large corner pantry as well as a floor-to-ceiling cupboard on the other side of the refrigerator.  There had previously been a mix of both food and other items in both cupboards so the first step was to remove the remaining foodstuffs (mostly canned goods and jars) from the cupboard.

I did not take any before photos as I launched into this endeavour early yesterday morning without a specific plan.

This is the cupboard once I had finished it.

2018-05-20 01

The top shelf is pretty much as it was with the Soda Stream, Easiyo, bucket with spare gas cylinder and Soda Stream bottles and pasta attachments for my KitchenAid mixer.  The pasta attachments were previously in the corner pantry.

The second shelf has 2 plastic tubs of glass jars and bottles which I use for storing juice and homemade sauces.  I have culled these considerably over a period of time as I have invested in more Mason jars.  In fact, I was able to swap them from a large and medium tub to a medium and small tub and move them from the top shelf of the corner pantry to this shelf which means they are much more accessible.  The large plastic tub fits neatly in the bottom of one side of the wardrobe in the sewing room so I will utilise it there.  But first, I have to finish the cupboard and the corner pantry.

The third shelf is various sizes of Mason and Weck jars with some spare lids and bands as well as a pair of lifting tongs from my most recent order.  These will make retrieving jars from the hot water bath much safer and easier.

2018-05-20 02

The bottom shelf is 4 buckets of bread flour – 2 white, 1 wholemeal and 1 rye.  This is GMan’s domain as he amkes the bread.

The corner pantry is still a work in progress but more about that tomorrow.

Mothers Day Makeover

2 Comments

For those of you who think this post is going to be about me with a new hairstyle or looking particularly glamorous, you are going to be disappointed.

GMan and I spent a good portion of yesterday and today (Mothers Day) working on a garden project.

Here are some before shots.

January 2018

2018-05-13 01

Then we planted some shrubs.

2018-05-13 02

Easter 2018 – GMan and my brother dug 6 holes and put in 3 posts.

2018-05-13 03

GMan and I then finished the remaining posts but then there was no more progress during April as we were busy socialising and celebrating.

Part of the grand plan for this space was to remove a portion of the lawn and plant some low to medium height native shrubs.  We had already planted a few in January and will add some more soon.

GMan dug up all of the lawn in squares then we covered the area with cardboard which we had been collecting for some time.  It makes a great weed suppressant and breaks down over time.  Finally, we covered the area with mulch which had been languishing in a pile below the chicken run.  This mulch resulted from some tress we had lopped ages ago.

I did not take any photos during the process as I was busy loading cut turf into the wheelbarrow and relaying it elsewhere.

2018-05-13 04

We did not have to move the turf too far as we have relaid beside the path just inside the gate.  It is a bit uneven in places but is an improvement on the state of this space previously.

2018-05-13 05

There is more to do yet – we will complete the portico and plant flowering creepers to cover it, plant some more shrubs and build a gabion seat in near the corner of the mulched area.

Like every area of our garden this corner is a work in progress and will develop over time.


Re-Purposed Boxes

Leave a comment

I am not a great fan of re-purposing as I feel that some people use it as an excuse for not trying to reduce the stuff (particularly packaging) that they acquire.  However, sometimes it is impossible to to gain items.  This was the case recently when my birthday gift from my work colleagues came in 3 matching cardboard boxes.  They looked too good to simply put into the recycling so I put them in the cupboard with the vague notion that I may be able to reuse them as gift boxes as they had no visible brand name on them.

Today I needed to pack up my sewing as I was going to a production day for our Boomerang Bag group.  I keep all of the sewing threads in a small plastic basket but it was not really easily transportable as it does not have a lid.  Additionally, the basket was overflowing, thanks to several reels of thread that had been given to me recently.

Thank goodness for the boxes.

2018-05-07 01

The threads fitted easily in 2 of the boxes and I put the box of bobbins as well as scissors, pins etc in the third box.

The slide-on covers mean that things could not fall out during transport.

2018-05-07 02

I have decided to keep the threads in the 2 boxes on the shelves in my sewing room.  The other notions are back in their regular places and the third box is available to transport them on future occasions.

2018-05-07 03

The small white basket at the far left of the shelf is identical to the empty one which previously held the threads.  I will probably rearrange things of some of the shelves and use it for storing other items.

The plastic baskets have stood the test of time as I originally bought them for dividers in the drawers of our bathroom vanity unit.  I subsequently replaced them with some straight-sided containers which were a better fit for that space.